Fine Art Prints and Printmaking

Early in our marriage, while we were both still in university, we discovered we shared a love of the visual and performing arts. Living in Philadelphia, we had access to the orchestra there, in the reign of Eugene Ormandy, as well as many other classical music programs throughout the city. We also had the Philadelphia Museum of Art, and its sculpture garden, as well as museums at the University. The University museum was a block away from the main campus central "quad", so a favorite lunch break included a walk over to and through the museum.

On one occasion, we attended a show of contemporary Japanese wood block prints and fell in love with the work of Sadao Watanabe. The show was mounted by a local gallery and the prints were for sale, but a friend of ours, more savvy about buying art, found that the Watanabe prints were from a gallery/print publisher in Kyoto, Japan, and we ended up buying the print we liked directly from the Red Lantern Shop. It was inexpensive, and arrived by mail in a few weeks. Along with a catalog from the Shop. We bought many prints from the Red Lantern Shop over the next decades and only stopped when the prices of Wantanabe's works became unaffordable for us. Around one hundred dollars, as I recall.

Years later, we hosted a printmaker for several years, Dale Schwichtenberg, who had been a studio assistant to Mauricio Lasansky for a while. Dale taught us a great deal about printmaking and print collecting and introduced us to the work of the senior Lasansky and that of his son, Leonardo Lasansky. Dale even set up a printmaking studio at our farm for a while where he had a huge American French etching press set up and operating. But he never found enough business in rural New Hampshire for his printing studio to ever become viable economically, and eventually he moved to New York to pursue his ambitions.

From Dale we learned a great deal about the history and techniques of "intaglio" print-making and continued our learning and collecting. About 25 years later, our son, Robert, was working for an MFA in painting and doing some printmaking (etching) as a minor. His work, and that of some of his colleagues, rekindled our interest in learning more about the techniques involved, and after a few years, when we opened a small art gallery a rather remarkable opportunity arose.

A local printmaker, Nichelle Wilson-Parish, needed a place to set up her press and we offered to provide her space to work in exchange for some printmaking lessons. She had a rather large (24"x 40") Conrad "monotype" etching press and we set that up in a separate room in the gallery, which became a working studio and a place to show prints for sale. Nichelle is an excellent printmaker and very generous with her time and knowledge. From Nichelle, we learned the basics of how to make a print (impression) from a metal plate - from how to select and prepare the paper, ink the plate, and produce consistent identical prints for a series (edition). We never got around to setting up the chemicals to do etching of metal, but we did learn to do lithography on polyester "pronto" plates. More information on the various printmaking techniques we now use can be found below.

To skip to section on etching (intaglio) techniques and examples, click here.

For information on polyester plate lithography, click here.

To skip to section on photo-etching/photogravure, click here.

Information on multiple plate and color printing here.

Opinions on papers here, and inks here.

Gallery of prints made in Santa Fe here.

Gallery of prints made in New Orleans here.

Around the time we moved from Arkansas to New Mexico, Gene got more interested in learning printmaking and decided to buy a press. We had to expand our Santa Fe home to accomodate all our hobbies, so a printmaking studio was part of the expansion. Gene got a Conrad press, nearly identical to the one Nichelle had loaned us and set up a printmaking studio. Here's a photo of the press as it was moved in and a second photo of the press amid the clutter of the studio once it was in operation.

Conrad Monotype press Santa Fe Studio

Gene soon made connection with some local Santa Fe etchers and printmakers, mostly through the Argos Gallery, the home of the Santa Fe Etching Club. Eric Thompson, the leader of the club and the gallery, taught an excellent introductory course in copperplate etching, using very traditional materials and techniques, adapted to be safe in the contemporary studio. Gene learned to prepare the copper plates, apply traditional wax grounds, and etch with a mild hydrochloric acid solution.

Incorporating the information from the Etching Club, from discussions with other printmakers, and extensive research on modern non-toxic printmaking techniques, Gene experimented over the next year with salt based etching techniques using copper sulfate and ferric chloride, and trying multiple types of "ground" or "resists" until settling on acrylic ground and ferric chloride etching of copper.

Later, Gene did a tutorial at New Grounds Studio in Albuquerque to learn how to do photopolymer etching (photogravure, or gravure). And through the usual trial and error,got this this technique operating as well.

Gene never got his lithography going with success in Santa Fe, as will be discussed below, however. He did get it going in New Orleans.

The press and all the equipment made the transfer to New Orleans, but the ultraviolet light exposure unit needed for the photogravure technique was inoperable after the move, taking gravure off the table. Although initially active doing etching, Gene began to spend more time with ship model building and after a couple of years, he sold the press, studio equipment, and supplies to make room for more ship models.

But, a few years after that, when we moved to a retirement community in the Algiers neighborhood on the "West Bank" of New Orleans, Gene had the opportunity to use a space within the community center to set up a printmaking studio and do some teaching. After a year, as the COVID pandemic took hold, he got another smaller, (15" x 30") Conrad etching press. Soon, the printmaking studio was closed to visitors and was able to work almost full time at ship model building and printmaking. The pandemic gave him time to experiment with new ground materials, since his favorite acrylic ground, Z-Acryl, was no longer made, and he had the ferric chloride etching working smoothly on copper purchased from a local sheet metal supplier. And he figured out lithography. And got the equipment and supplies to photo-gravure again. Although the print studio re-opened briefly, the COVID second (or third) wave soon closed it again and it remained closed unti we moved again in early 2022.

Here's a picture of the small etching press purchased during the pandemic. It is still in use in the current print studio.

Conrad Etching press

Once common sense control measures and high local vaccination rates had wrestled the pandemic down to the level of a chronic background risk, things in New Orleans began to re-open. And the local symphony and chamber music society announced a new season. As we looked forward to resuming a relatively normal social life we realized that crossing the Mississippi River on the Crescent City Connection to attend the many events we loved was too big a barrier for us. Public transportation was not an option, nor the ferry, and the transportation services provided by our retirement community were restricted to medical appointments and necessary shopping trips.

So after plenty of discussion, we decided to move back to the "East Bank" of the city. We found a good-size apartment in a building known for its "artist's lofts", and began planning and down-sizing for yet another relocation. In the new apartment, Gene set up yet another printmaking studio in space shared with the ship model building and by mid 2022 was back at work.

Some examples of Gene's prints are included in the sections about specific printmaking techniques, and a more extensive collection can be found in the immediately sections below.

To skip to section on etching (intaglio) techniques and examples, click here.

For information on polyester plate lithography, click here.

To skip to section on photo-etching/photogravure, click here

Thoughts on inks here.

Some brief notes on multiple plate color printing here.

Notes and personal opinions about papers here.

Prints made in Fayetteville

These are just a few of the prints done in Fayetteville. Most of the art work was done by others, and Gene just printed them.

First, two dry point engraving by Rob Andes. He based the images on paintings he had done, and just sat in the gallery with an 8 x 10 copper plate in his lap as he sketched the images.

The Italian - drypoint Refugee Child - drypoint

We also collaborated on some lithographs made from drawings, again based on paintings he had done. The technique we used is described in the section on polyester plate lithography here.

The Opening - lithograph Visitor - lithograph

Once more comfortable with the process of printing an etched or engraved plate, and after doing a little lithography, Gene tried some photo-polymer etching using "solar plates". The first experiments were pretty primitive, simply making ink drawings then transferring them to transparencies in a photocopier and clamping the transparencies to the solar plate, which was then exposed to the sun. It was pretty simple and good for line work and later was a technique used for embossing, but it was nowhere near the quality of images that could be obtained by the more advanced "gravure" technique. All that came later.

Here's a photo-polymer etching print made from a drawing based on illustrations from a book about the HMS Surprise, illustrated by Geoff Hunt.

drawing of HMS Surprise

For more information on photo-polymer etching and photogravure, skip to section on photo-etching/photogravure, click here

Gallery of prints made in Santa Fe

These are two etchings on copper using Ferric Chloride etch and acrylic ground. The one is a sort of copy of a Sir Francis Seymor Hayden print from 1870 showing the breaking up of the HMS Agamemnon of 1852. The original plate was seven and three-quarters inches by sixteen and three eights inches, and was a much, much finer work than my copy.

The second is an etching based on a JMW Turner painting, The Fighting Temeraire, which shows a famous sailing ship being towed by a steam tug to the breaking yard. This print uses etching, drypoint, and spit bite.

etching based on Hayden print - 6 x 9 print based on Turner painting - 6 x 8

I also did a large number of smaller plates to make greeting cards and book plates. Always looking for a way to produce something useful. It was a long time before I ceased to worry about utility and just started making prints I liked.

I made some etchings of New Orleans shotgun houses, mostly based on pictures and sketches made on trips there. Already, my heart was back home in New Orleans, although my body was living in Santa Fe.

These are three etchings of shotgun houses. Ferric Chloride etch, Z-Acryl acrylic ground, on copper. There was no additional working the plate after the etch. Note the bold lines attained with this combination of materials. The first picture is and etching of a house at 1325 North Lopez street, very close to the first apartment we rented in New Orleans when we moved there in 2016.

New Orleans camelback Shotgun house - 9 x 12

New Orleans shotgun house - 9 x 12

New Orleans Shotgun House - 12 x 9

At around that same time, I was learning to use the photogravure technique. I made a few prints from graphite drawings using the photopolymer etch technique. I photographed the drawings, adjusted size to suit and the brightness and contrast for the gravure technique, the printed the image on Pictorico transparency plastic sheet on an ink jet printer. The transparency is used to expose the polymer plate in the process described in the section on gravure.

gravure from drawing of 
shotgun house gravure from drawing of shotgun house

I also printed many gravures from photos taken of New Orleans houses. And even one of a New Orleans stable or carriage house in the Garden District.

New Orleans house - 8 x 10 New Orleans shotgun gravure 8 x 10

And here's the stable, New Orleans style.

New Orleans stable 8 x 10

And of course I did make some prints of scenes around Santa Fe. Here are a few small ones done for more greeting cards. One has a hand colored version.

Marcy Street house backyard shrine backyard shrine

And a few gravure images, too. The first is of a mesa on the road north of Santa Fe. The second is a gravure from a photo of the backyard shrine we passed each day on our walk to the Plaza. Printed in black and in sepia.

mesa

Santa Fe shrine black Santa Fe shrine sepia

I also did a large series of etchings based on paintings and drawings by Egon Schiele. He was a master at drawing and could capture so much with a single stroke that I felt adapting his images to etching and drypoint might work well. Here are a few from that series, hand-colored using water color pencils.

etching based on Schiele etching based on Schiele

etching based on Schiele etching based on Schiele

There were many more etchings done there as well as experiments with other photopolymer techniques than the KM plates. All part of the learning process and mostly discarded.

I did make two small books there. One was based on a novella by our son Thomas about a visit to New Orleans and being in love, illustrated with some etchings. The second project was a pair of leather-covered bound sketchbooks or journals for our son Richard and his wife, Natalie, featuring their hawks. The covers were embossed in the etching press using thick solar plates as the matrix, then painted. Inside, each had four gravure prints of graphite and charcoal drawings of their two hawks, Houdini and Sora. Here are pictures of the covers of the two books and the four hawk pictures in each. The rest of each volume was blank pages for drawing or journaling.

Houdini's book Sora's Book

Hawk gravure from drawing print based on Turner painting - 6 x 8

Hawk gravure from drawing Hawk gravure from drawing

With this sampling, we conclude our brief tour of work done in Santa Fe. And move on to work done later, in New Orleans.

Gallery of prints made in New Orleans

Work in New Orleans happened in two periods. The first was restricted to a few etchings and reprinting of plates made in Santa Fe and brought with us on the move. There was not much work done in the first five years we lived there, and the press was sold in the third year, so printmaking ceased.

Printmaking began again in earnest at the end of 2019, when we moved to the retirement community and I finagled the use of some space to set up a printmaking studio. Once the pandemic set in fully and things really shut down, I got a press and equipment and supplies and began to work in earnest at printmaking again. Once quarantined, I spent mornings working on ship models and afternoons making prints. The hermit like existance is to be recommended as one way to increase productivity.

Early on, before the press entered the picture, I did some relief prints, teaching a small group how to do linoleum prints. I also did some Japanese style wood block prints after taking a workshop with April Vollmer the last summer we were in Santa Fe. The techniques of Japanese wood block printing are really interesting, and there is a really nifty and easy system for registering prints when printing multiple colors. The system is explained well in April's book Japanese Woodblock Print Workshop in addition to lots of practical notes and information and splendid examples of her work. The book is available through April's site or Amazon. I am still working on how to adapt the Japanese wood block resistration system to printing multiple colors on etched copper plates.

Here are a couple of woodblock prints done in the style of Watanabe that I did while awaiting the arrival of my press.

woodblock print Adam and Eve 10 x 8 woodblock Madonna with Child 10 x 8

When setting up the printmaking studio from scratch, I got things going in pretty much the same order I had learned them in Santa Fe. First, I got copperplate etching working using some copper I had on hand, then found a supplier of roofing copper and worked on more plates to adapt to the new grounds I was using.

The, pretty early on, I began to work seriously with Aquatint. I used the basic spray can technique, which is hard to control and hard to get consistent results with, but after a few mis-steps had it working well for me. So then I had etching, drypoint and aquatint in my pocket.

The next step was to try lithography, which had not worked for me in Santa Fe despite many tries. I was attributing the failures there to the difference in humidity between Fayetteville, Arkansas, where it worked well and Santa Fe, where it did not work at all, but I was not anywhere near understanding the reasons for the earlier failures. I refer you to the section on lithography for a more detailed discussion of how to create a lithographic plate on polyester using a laser printer or copier, but what was going on was that I was making the plates in Fayetteville on a huge commercial grade laser copier at the local Fedex-Kinko's shop, but in Santa Fe was making them on a friend's small laser printer-copier for home use. The larger machine must have been set at the proper dots-per-inch or lines-per-inch by happenstance and also likely had a hotter fusion roller so the plates printed well and did not degrade with use. Either happenstance, or perhaps an art student who worked there part time and set up the copy machines. The smaller machines designed for personal use, not so much. So with a few failures and trying out various laser printers and copiers at the facility and at local copy shops, I finally purchased a small, inexpensive, laser printer (not copier) that had settings adjustable to get the DPI I needed. Then I only had to "bake" the plates as described to get what I needed.

Once I had the basic plate-making figured out, the next move was into multiple plate, multi-color printing. I did a few lithographs working from drawings, photographing them and adjusting size and contrast to print them with the laser printer and most of the time all went well, as long as the toner was well fused to the plate by the baking.

So the next step was registration, the great bugaboo of the print shop. See the relevent section for more detail, but below in the "gallery" there are some examples of color lithographs and discussion of next steps.

Around the same time as color lithography was coming together, I found a source for another ultraviolet exposure unit and, once that arrived, I began to explore photogravure again. In the gallery are also some examples of recent prints made with the gravure technique.

The next step is to combine an etched copper or photogravure master plate with secondary lithographic plates for adding color. I have figured out how to do this and will be working through the process in the near future, so look back for new additions to the gallery before too long.

Now, the "gallery".

Intaglio

The first etching done in the new studio. Three plates of "The Three Graces". The first based on a painting from early 1800s by Reubens, the second on a photograph from the 1900s mimicking the pose in the painting, and the third, adapted from a photograph taken at Burning Man.

three graces 1820 12 x 9 three graces 1920 12 x 9

three graces 2020

I also did a large series of portaits of famous composers on small plates, sized to make greeting cards. But with litle traffic to the studio during the pandemic, and most of the few visitors not recognizing the composers in the pictures anyway, I quickly abandoned that project. And for the most part, quit making greeting cards for a non-existant market.

I did a series of small (6 x 8) etching of local bars in some of the neighborhoods we frequented. Here are "B.J's in the Bywater, where we went to the Blood Jet poetry readings and Little Freddie King plays on Fridays, and "Vaughan's" a block away where Kermit Ruffins used to play on Thursdays, both in the Bywater. And "Pal's", "Parkway", and "Liuzza'a By the Track", all in Bayou St. John. And "Lafitte's Blacksmith Shop" in the Quarter and "The Olde Pointe Bar" in Algiers Point. And "Snake and Jake's Christmas Tree Lounge", handy to the Tulane campus, uptown.

B.J.s in the Bywater Vaughans

Pals Parkway

Liuzzas By the Track Lafitte's Blacksmith Shop Bar

Olde Pointe Bar in Algiers Snake and Jakes

The next step was to add aquatint to the etchings. Following are some samples of work where aquatint was used and there are plenty more in the section on aquatint.

First, a couple of etchings of tattooed ladies. These were done as exercises in line work to represent the tattoos, similar to other images of lace. In the second image, aquatint was used to darken the background. These images are all 8 x 10 inches.

woman with tattoos hand colored etching

tattooed woman etching etching with aquatint

hand colored etching

Aquatint takes a while to learn enough to produce consistent results, but it is useful and fun. It has some dis-advantages, however. Although it is a good way to produce a dark black area, the plates are tricky to ink well when wanting to produce a number of identical prints. And the surface of the aquatinted area, made of very small bits of copper protruding from the etched background, wears away more rapidly than other areas of the plate so the dark area may fade with subsequent impressions. As happened with the many later "editions" of Goya's plates printed and published after his death.

I also used drypoint to make dark areas. It is possible to get a deep, velvety, black with drypoint, but that technique has a similar problem to aquatint in that the fine burr produced by the drypoint needle also wears away fairly quickly as the plate is wiped and printed. And since it is the burring of the line that holds the extra ink and gives the blurred line characterist of drypoint, the dark areas may also fade with repeated impressions.

Here's an example of a print done entirely in drypoint. It is also 8 x 10 inches on copper. The technique was used especially to produce the black hair and the black of the eyes.

Mexican girl

With the etching going well and consistent results with aquatint, I moved on to make another try at lithography. This time, I did a lot of research and reading, mostly on-line. There was also a great deal of experimentation involved. Details of the learning and the processes that worked for me are in the Lithography section.

Again, I was interested in using the technique to produce heavy dense black areas. As noted in the section on technique, when making laser-printed plates, this is where it gets tricky and you have to know how to set up the machines and software you are using to get a usable print.

And since I also wanted to use the technique for color prints, I had to solve the issues around registration. More discussion and information in the section on Registration.

Here's a color lithograph using four plates made with one of the registration systems I use. The image is 9.5 x 6.5 inches and was printed using polyester plates that were 11 x 8.5 inches which allowed me to register the plates using the on-plate marking system as described in the technical section on Lithography. It was about the fourth lithograph I made and because I had not yet figured out how to "bake" the laser plates, it degraded swiftly and I only got about 6 impressions before the plates faded or lost detail. The image was processed from a photo using GIMP and the color separations were done as separate layers. The colors chosen for the separate layers were colors in the original photograph, not a CMYK separation. Then each layer was printed onto the polyster plates separately. There was no "master plate", but there was a black color plate.

In preparing the plates for this image, I also converted the individual colors in each layer to black, so I ended up with a series of four plates, each of which was black on the plate, but was printed by inking with a different color. In doing this, I increased the density of the dots produced by the laser printer in each color field so the area would take up more ink and print a more intense color.

Laser printers and copyers are set up to render half tones by using intermediate densities of dots. Lighter colors or lighter shades of the same color will print with fewer dots and the resulting plate will hold less ink and print the color lighter. This is something you can take advantage of, as you will see in later examples, or something you can by-pass by converting each color, after separation, to black to get a consistent, dense application of the ink from each plate.

Singer - Lithograph

There are other examples of lithographs in that section.

Current work in lithography involves the use of colors, printing multiple plates using the pin registration system.

Following are some samples.

The first is a photolithograph from a photograph of a mural painting of local singer Meschiaya Lake on a side of a building in the Marigny. The lines created by the bricks which were prominent because much of the mortar had eroded away befort the wall was painted, made for an interesting appearance and the many colors used made for a registration challenge. The image is about 8 x 10 and there were eight plates used. Separations done to layers in GIMP but the colors were not converted to black, hence the variations in density of each color.

Marigny mural lithograph

Here are a couple of photolithographs, made by importing a photo to GIMP at 300 PPI, converting it to monochrome color, adjusting contrast as needed, then printing it to a laser plate in a laser printer set at 1200 DPI. The images are about 10 x 8 inches. The original photographs were taken at a Super Sunday Mardi Gras Indian event about 2015 or 2016.

Indian printed in black

Indian printed in sepia

I played about a little with both these images. The first one was of an Indian dressed primarily in colors of blue and carrying a banner honoring a recently deceased Big Chief, Bo Dollis. I wanted to print the image in color.

I imported the photograph into GIMP and did color separations into layers, creating three layers (and three plates) for the shades of blue and violet in the feathers, and other layers for gray, yellow, dark red, red, green and black. Again, there was no master plate. Nine plated in all, printed with pin registration system. The final print looks like this.

Mardi Gras Indian in blue

Then I did another version of the same image. I went back to the original GIMP file and combined the three blue layers into one. I combined several of the other layers (red and dark red) into a second layer. Then I made plates from these two layers and a master plate. I printed a blue layer and a red oxide layer then overprinted these with the black master plate, which was identical to the original black print shown above.

This "simplified" color version looks like this'

Indian in Blue, simplified

The other Indian, in the sepia image above, was dressed in green and yellow feathers. I wanted to make a color print of that image also, but went about it differently. using a "master plate", identical to that used to print the sepia image above but intended to be printed with black in this print, I overlaid it with a blank polyester plate and drew on areas to be colored using a lithographic crayon. I used a #5 crayon, which gave good detail for the feathers, but is was less greasy that turned out to be ideal, so I will use a #1 or #1 in the future. Once I had made a plate for green, I made one for yellow and one for red and one for brown. As it turned out, I could have made the brown areas by printing red over green and will also be more attentive to the possibilities of color mixing by the printing itself in the future. Once the four color plates were printed and dry, I printed the master plate in black. I used the pin registration system. The final image is 10 x 8 inches.

Indian in Green, color litho

So there is plenty more to explore using lithography. Present projects are incorporating a combination of an etched master plate with lithographic plates for color. It is just too expensive to use 4 or more copper plates for a print. Polyester lithographic plates are inexpensive. And can be thrown away after printing, saving storage space.

I did experiment a bit with lithography on wooden panels, a technique known also as "Mokulito" or "Mokurito". This involves creating an image on a sanded plywood panel using markers or litho crayons or similar material, then treating the panel with a gum arabic solution before printing the plate under modest pressure or even with a baren. The technique was said to produce an image in which the grain of the wood was also visible. Not so much, at least in my experience. I would be more interested in a technique that has the wood grain as part of the background and a stark image against it. And I may try getting that later using two wooden plates, but for now, I am sticking with the polyester lithograhpic medium. The polyester plates are much less expensive than plywood anyway. Here is one sample of a lithograph on wood. The image was created with lithographic crayons and printed using a "fountain solution" containing only diluted gum arabic and citric acid. Details in the information on fountain solution in the lithography section.

After the first few lithographs satisfied me that I could use that tecnique in the studio, I added photopolymer etching, or "photogravre" to the techniques I use. The first step was to get a UV exposure unit, but once that cost was sunk and the plates acquired, I was able to calibrate the machine and experiment to find the exposure times and printing techniques that worked in that studio. Naturally, after the move in early 2022, all the calibration and experimentation was repeated.

Details of the gravure process, from notes on calibration of the UV exposure unit through manipulation of the image prior to creating the plate are discussed in the section on photogravure,

Here are some samples of prints made from photographs. All are about 8 x 10 inches.

This print is from a photograph taken in 1969 on a trip to Fort Macomb, on the Chef Menteur Pass approach to New Orleans. It was one of two forts built in 1822 to guard the approaches to lake Pontchartrain and the lake side of New Orleans. The forts were built after the British had invaded Louisiana that way, an invasion that ended with the "Battle of New Orleans" in Chalmette. Both forts have been owned by the State of Louisiana since the early 20th century, but the state only had the money to preserve one, Fort Pike, about 10 miles further in on the "rigolets" approach to the lake. Fort Macomb continues do decay. Fort Pike is closed to visitors, awaiting state funding to repair damage from hurricanes.

I have a lot more photos from that visit and may print them some day. In this print, I wanted to capture the moody sense of decay at the abandoned fort.

Fort McComb

When from Santa Fe to New Orleans or back, one route takes me through Clovis, New Mexico, then through two small nearly abandoned towns, Encino and Vaughn, New Mexico. The latter two were small towns that grew up along the Santa Fe rail line passing through the area in the early 20th century. Encino was a small market town for surrounding sheep and cattle and subsistance farmers. There are less than 100 people still living there. Vaughn was a Santa Fe Railroad town and became quite properous around 1910 when a second rail line intersected there. It had a rail station, which still exists, and even a Harvey House, which does not. At its peak, during the Second World War, Vaughn had a population under 2,000 persons and today has a few hundred residents. The rail line still passes through Vaughn, but does not stop.

The first photo is of an auto scrap yard just on the western side of Clovis. The second is along the road to Vaughn. The third is in Encino.

Clovis Auto Parts

Female Vocalist Wanted

Encino Motel

This is from a photo of a large gazebo-like structure and a fountain at the Fort Brown site in Brownsville. Fort Brown was the location of a U.S. Army fort during the Mexican-American War. It was established in 1846 and the city of Brownsville was established in 1849, after the war resulted in the land becoming part of the U.S. Fort Brown is also known as the site where Dr. William Gorgas contracted and survived Yellow Fever and did his preliminary work on the disease and its cause. He developed sanitary measures later used in Panama which enabled the building of the Panama Canal. The hospital he managed there and the morgue where he and associates autopsied yellow fever victims are still there. The fort was acquired by the City of Brownsville and Texas Southmost College in 1948 and is presently the site of the College.

Fort Brown, Brownsville, TX

Print from a photograph of one of the 1200 live oak trees in New Orleans' City Park.

City Park, ,New Orleans

Print made by layering images in GIMP then printing the result on a transparency. It is possible also to layer transparencies when making the exposure.

woman with lace

Technical Information, Shop Tips, Opinions, and Lessons Learned

Intaglio techniques

In a simple-minded way, printmaking can be divided into several categories, based on the technique used to create the final image or impression.

The first group is known as "Intaglio". This includes a number of common etching and engraving techniques all of which produce a master plate in which the image is "incised" into the surface of the plate, and the subsequent impressions are made by putting ink into the incised lines and marks of the plate, wiping the rest off, and printing what is left. The printing process usually uses paper which has been moistened to soften it and to open up the paper fibers to better absorb the ink. The plate and paper are run through a roller press at extremely high pressure with the paper backed by layers of softer paper and felts which soften and diffuse the press pressure to bette force the paper into the grooves of the plate so the ink is absorbed into the paper.

In engraving, the artist maked the lines and marks on the plate directly using a sharp steel tool. The oldest and most commone engraving technique probably came over to the print shop from the silversmith's operation. A sharp pointed thin steel tool, somewhat like a chisel, is firmly pushed by the artist into the surface of the metal plate and moved along to create a line by removing metal to make the groove. As the engraver works, thin curls of metal thus removed are brushed away as s/he works. In the end, the artist has produced a polished metal surface with a design made up of multiple lines incised into that surface. Another common example of engraving is the "dry point" technique in which a sharp steel needle us used to make the line not by removing metal but by pushing up the metal on either or both sides of the inscribed line. A dry point plate will thus have a smooth metal surface but the lines inscribed in it will have a palpable burr along one or both sides. These burrs also catch ink along with the groove as the plate is inked, so the resulting line in the impressions are different with dry point than with engraving.

Etching substitutes a line made by the chemical action of an "etchant", most commonly an acid or corrosive salt upon the specially prepared surface of a metal plate. The plate is first covered with some substance that will resist the action of the chemical that will be used to make the line. The artist then uses a small needle tool to draw on the resist, creating the pattern by removing the resist where the line is drawn. Then, when the plate is exposed to the etchant, the resist prevents etching of the plate except in the areas where the resist material has been removed, thus creating the line image. The line that results is not as smooth as an engraved line and will look irregular under magnification but under most circumstances, will look very much like an engraved line. Etching is an old technique, probably originating in the 1600s or before and early on became popular as an artist medium for several reasons. It does not require a metal plate as finely polished and smooth and even as does engraving. It is much easier to create the desired lines by scribing them into a ground than using engraving tools to make the lines. Engraving is much harder to master. And etching was faster, much faster, than engraving.

Both these techniques produce an image made of lines. The lines may be fine or coarse, but they are still lines, typically black lines on a white paper surface. So the artist is limited to those two colors, black or white. Intermediate shades, the grays, are hinted at, represented by, alluded to, by drawing techniques such as hatching and cross hatching and the like, building up differing degrees of density of line to represent darker and darker grays. But they are still lines. Look at the image on paper money or a stamp and you will see these engraved images are just lines. By a sort of tacit agreement, the viewer's eye and brain interpret them as shading or shadow or shades of gray.

So I like to think of the history of printmaking, at least early on, as the search for ways to print actual intermediate shades, grays, and for ways to print colors. Printing intermediate shades was first solved with the development of aquatint techniques. From the beginning, colors could be added by hand or could be added by printing with multiple plates, one for each color. Even after the development of photographic color separation techniques, multiple plate printing is still how color printing is done. More later on color techniques under registration.

First, let's review the basic etching process.

Etching

These notes on etching are from the "Print Shop Manual" prepared for the print studio at the Woldenberg Village retirement community. The studio is now closed and the space used for storage of crafts materials.

Etching on Copper:

This section provides some background on the copper we use for etching and some detail on the specific materials and techniques used in the studio. The basic process involves the use of a Ferric Chloride solution, which is a salt, to etch or eat away the metal, in this case, copper. This is the technique used in the electronic industry to make printed circuit boards, so the chemicals and materials used are readily available. This process has the added advantage of being non-toxic. There are no vapors given off during the etching, and the Ferric Chloride itself has little toxicity. It does stain things, however, and will etch things like stainless steel sinks or copper pipes, so some care is needed.

Ferric Chloride also can be used to etch zinc or brass, but if that is to be done, one must maintain completely separate ferric chloride solutions for each metal process and not mix them or use a solution that has etched one type of metal to etch the other.

The image to be created in our etching process is made on copper sheet. The copper sheet is generally referred to as the "plate" or sometimes as the "matrix" or the "master".

Materials

Commercially, copper sheet comes in different thicknesses and the thickness is denoted in different terms, depending on the supplier and the use it is intended for.

The term "ounce" refers to the weight of copper in one square foot of the sheet of that thickness. It is the term used most commonly in the roofing industry. A larger ounce number means thicker metal.

The term "gauge" is an antique description of the thickness of the copper sheet based on the diameter of a length of wire of that thickness that could be made by drawning the metal into wire through a standard size hole in a draw plate. The number, in the system used in the U.S. refers to the number of feet of that size wire that can be made from a pound of copper. In this case, a larger gauge number means thinner metal. Copper plates sold by artist supply houses are usually described in terms of gauge.

It is also common to simply state the actual thickness of the sheet. This is a direct measurement of the thickness of the sheet and can be stated millimeters or inches. In the chart below, thickness is given in inches. Actually in thousandth of an inch.

Commonly available copper sheets come in these sizes:

4 oz copper is also 36 gauge and is 0.0050 inches thick
8 oz copper is also 31 gauge and is 0.0108 inches thick
10 oz copper is also 28 gauge and is 0.0135 inches thick
12 oz copper is also 27 gauge and is 0.0160 inches thick
16 oz copper is also 24 gauge and is 0.0216 inches thick
20 oz copper is also 22 gauge and is 0.0270 inches thick
24 oz copper is also 21 gauge and is 0.0320 inches thick
32 oz copper is also 19 gauge and is 0.0430 inches thick
36 oz copper is also 18 gauge and is 0.0485 inches thick
48 oz copper is also 16 gauge and is 0.0647 inches thick
56 oz copper is also 15 gauge and is 0.0750 inches thick
64 oz copper is also 14 gauge and is 0.0863 inches thick
72 oz copper is also 13 gauge and is 0.0930 inches thick
80 oz copper is also 12 gauge and is 0.1080 inches thick

Probably 16 and 18 gauge copper sheet has been most commonly used in etching in recent times. But I have experimented with other thicknesses with good results as will be discussed below.

There are multiple sources for copper suitable for etching.

Art supply companies:

Graphic Chemical and Ink Company, Dick Blick, Renaissance Graphic Supply, and others.

Graphic Chemical, for example, supplies copper in two thicknesses: 16 Gauge (.064 inch) and 18 Gauge (.050 inch). The 18 Ga metal is only slightly cheaper than the thicker 16 Ga metal. The 16 Ga metal is also provided pre-polished on one side protected with a plastic cover and the other side backed with acid resistant material. All these plates are very expensive and costly to ship because of the weight. I do not think that you need to use copper this thick for etching (see below).

Commercial Copper suppliers:

Copper sheet metal is used in many commercial and building applications, especially roofing, and there are multiple companies which can supply it. Not all will be willing to deal with a small order or to process it for you, but you may find someone in your area to work with you and shear the large commercial size sheets into sizes for etching.

Here are various sizes of roofing copper that I have gotten quotes on through the years, all of which are fine for copperplate etching:
16 oz. copper 0.0216 inch thick (24 Gauge) 36 by 120 inch sheet
20 oz. copper 0.0270 inch thick (22 Gauge) 36 by 96 or 120 inch sheet
24 oz. copper 0.0323 inch thick (21 Gauge) 36 by 96 or 120 inch sheet
32 oz. copper 0.0430 inch thick (19 Gauge) 36 by 96 inch sheet

In 2012, in Albuquerque, I bought the thickest (.0430 inch) and had it cut into plates ranging in size from 9 x 12 down to 3 x 5 inches and ended up with 78 plates from one sheet of 36 x 96 copper. The company put polyethylene plastic on one side which largely protected it from scratches, and the plates needed little polishing to be usable for etching.

Subsequently, I experimented with thinner copper (see below) and concluded that the thicker copper was not necessary. I used copper of 0.008 inch and 0.016 inch thickness with satisfactory results but found the heavier 0.016 material easier to handle. These thinner copper sheets have the advantage of being cuttable with a desk top heavy paper shear or heavy scissors. (see below)

I found a supplier for sheet copper in New Orleans stocking. in 16 oz, 20 oz, and 32 oz sheets generally three feet wide by eight feet long. The company would also custom shear a sheet to specifications for a small additional charge.

The cost of copper fluctuates with global metal prices and the variation can be extreme, so every purchase needs a new quote. But the cost per plate will be much lower than the cost to purchase from an art supply house, especially if purchasing the thinner material. Generally, the plates sheared from roofing copper will need to be sanded smooth before being usable for etching, however, as the handling in the warehouses and the shearing will scratch the metal.

In 2021, I purchased a sheet of 20 oz copper and had it sheared. The 20 oz copper is 0.0270 inch thick, so it handles well, and it can be trimmed or re-cut with my shop "Kutrimmer" paper cutter, which also can cut the thin steel backed photo polymer plates I use for gravure. The commercial shearing of the sheet left some surface scratches but nothing that did not sand and polish out easily with my power sander (below) Copper of this weight and thickness is cheaper than traditional plates and works just as well.

K and S metal company, a major hobby supplier, makes thinner copper sheet for metal punch and other crafts. This material was formerly 0.016 inch (26 Ga) thick and stocked at Hobby Lobby stores. It comes wrapped in a protective plastic cover and is usually ready to use without polishing. In my experience, this copper is thick enough for etching and with care works fine in the press under modest pressure.

Unfortunately, as of 2020, the K & S sheets sold by Hobby Lobby are much thinner, at 0.008 inch or about 32 gauge. This thinner material is usable, but not really substantial enough for standard etching, and is not easy to handle. It can be used as a secondary plate to be placed on top of a thicker master plate if one is using that technique.

I don't know why the thinner sheet was made but after about a year, the thicker (0.016) sheet began to reappear on shelves.

One real advantage of using thinner copper sheet is that thinner copper (0.0270 inch and below) will cut nicely with a simple table top shear, a paper cutter. I bought a "Kutrimmer model 1135". These cutters are used commonly in print studios to cut the steel photo polymer plates (KM and thinner Solar Plates) but also work nicely for the thinner copper. They won't work for copper 24 gauge and heavier.

It is very useful to be able to recut or resize or trim a plate in the studio. Sometimes you want to trim away part of an image to reformat it. And sometimes you may wish to reuse part of a plate in a new project.

Cleaning/surface preparation of copper

Once the copper is cut to size, it must be prepared for application of the material which will resist the etching solution, the "ground" or "resist". This means the plate must be scrupulously mechanically and chemically cleaned so the resist material will adhere to the metal. This is a multi-step process involving sanding and polishing the plate smooth, then removing grease and dirt to chemically clean the surface.

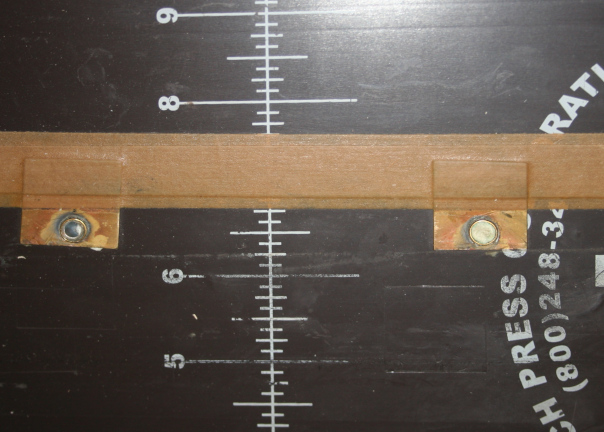
The steps in preparing a plate follow:

One: Burnishing the edges of the plate rounds them over and removes sharp edges that could cut the press bed, the printing paper, and the press blankets. Rounding the edges can be done with a hand file or sand paper, but the easiest and fastest way is to use a special tool called a "de-burring tool". The tool is different from the scrapers and burnishers used on the surface of the plate. The de-burring looks like this:

de-burring tool

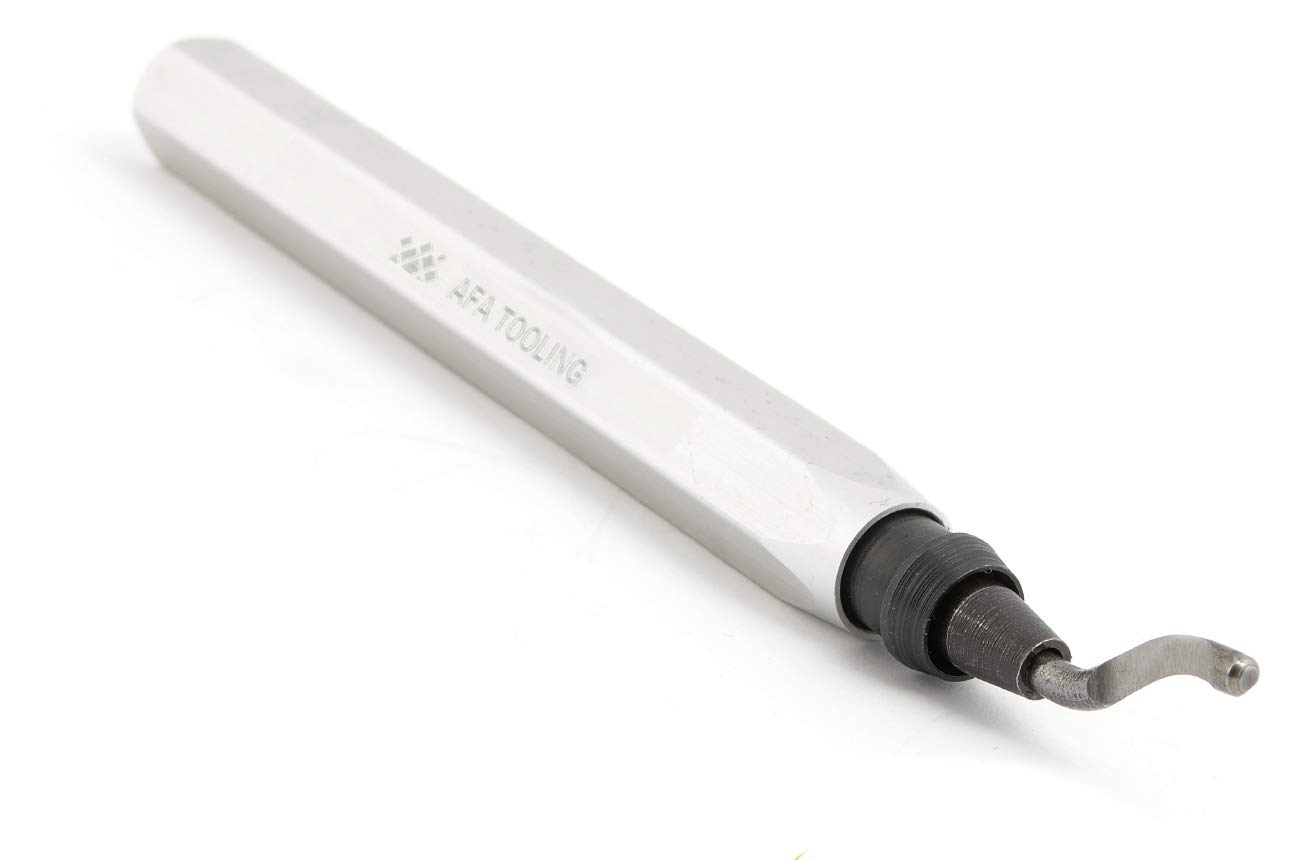
The hooked end swivels and has a sharp cutting edge and a blunt tip. In use, the tool slides along the surface of the plate allowing the sharp cutting edge of the tool to remove a thin strip of metal from the edge. There are several versions of this tool and the best one has tips that are replaceable when the tool becomes dull. Availabe through Amazon.

Once the edges and corners are smoothed, the printing surface needs to be prepared to receive the “ground” or resist material, and the back needs to be protected from the action of the mordant when the plate is etched.

Second, inspect the plate to see if there are scratches or marks on it that will catch ink and print. If the plate has a protective plastic cover layer, remove it and inspect the surface. Pick one side of the plate to work on. You will polish one side only (the front) and will put contact paper, adhesive shelf lining paper, on the "back". I usually cut the contact paper about an inch oversize all around, remove the backing , place the paper on the work surface and put one edge of the plate face up on the paper near the edge closest to the edge of the gable. By starting at the end towards you and then sliding the plate and paper over the edge of the table, you can get a pretty smooth application. Then put the plate face down on the table and rub the contact paper starting in the center to adhere it to the metal and work any air bubbles out toward the edges. I use a Exacto knife to trim the paper along the plate edge, cutting from below (the backside of the plate) and taking care not to scratch the face of the plate.

The next step is polishing the face of the plate. Plates can be polished by hand. Start with emery paper or other wet sanding paper of 320 grit and work on a perfectly smooth flat surface using a sanding block and pad to hold the paper. Depending on how deep the marks on the plate may be, start with a 220 or 320 grit paper and sand the surface until the marks are gone. Then work through progressively finer grit paper – 600, then 800, 1000, and finishing with a 2500 grit paper. Then polish using a "rouge" or polishing compound as used by jewelers or auto body finishers. This is a long and boring process. Not recommended.

Plates are also easily and quickly polished using a power sander-polisher. I have used a variable speed 5 inch diameter random orbital sander-polisher with good results. These are available from arious manufacturers such as DeWalt, Bosch, Makita, etc, and are available at Lowes or Home Depot.

These "palm sanders" use discs that attach with hook and loop (Velcro). Sanding discs of various grits, including very fine grits such as 800, 1200,and 2500 are available from Amazon. If preparing plates for engraving, you will also need a sheepskin or fabric polishing pad and polishing compound to produce a mirror finish after sanding with the finer grits.

If using a power sander secure the plate when sanding it or the sander may spin it away. Use a piece of plywood as a sanding base and glue very thin strips of wood (the thickness of the plates) along two sides to form a corner pocket to hold the plate and prevent it moving about when sanding. Clamp the plywood to the work table and don’t forget to use respiratory protection and if possible work outside, as the sanding and polishing will create fine metal dust.

In general, unless you are preparing a plate for an engraver, you can finish up with the 1500 grit sanding paper and it will be fine for routine etching, as the final cleaning uses "Brasso" and/or "Barkeepers Friend", which both contain fine polishing material. I also keep some finer paper on hand (2500, 3000) to touch up a plate before the final cleaning if needed.

Chemical cleaning is done after the plate is sanded and polished smooth. This cleaning is a chemical and mechanical cleaning to remove any grease or oily residue. The process goes something like this:

Wash the front and back of the plate with warm water and mild (dishwashing) detergent. Dry with a lint free paper towel or soft cotton cloth. (Kim-Wipes are good.)

Re-wet the plate and apply a good amount of Brasso metal cleaner. Use a gentle circular scrubbing motion to work the Brasso over the entire front surface of the plate. Brasso is a solution of diatomaceous earth as a mild abrasive combined with a mild ammonia solution. You will notice the odor of ammonia when you use it. Wash the Brasso off under running water. Repeat the cleaning with Brasso for a second time.

Sprinkle "Barkeeper's Friend" cleanser over the surface of the wet plate. Barkeeper's Friend is a dry powder cleanser that is also diatomaceous earth but combined with oxalic acid. Again, carefully and gently scrub the surface of the plate. Rinse off under running water and repeat the cleaning. During the two step cleaning with first the alkaline (Brasso) and then the acid (Barkeeper's Friend you may notice the copper changes color to a lighter pink shade. That is fine.

During the final rinsing with water, the water should sheet across the entire surface of the plate and not bead up. You may have to repeat the final cleaning step several times to get all the edges cleaned.

Wipe the plate dry with a lint free paper towel, Kim-Wipe, or clean newsprint, front and back. The plate is now ready to apply the resist or ground. My current preparation method for copper is a bit simpler because I am using a different ground as explained below. This preparation and cleaning method should be suitable for any ground you might like to use. As will be noted below, I am currently using B.I.G ground, and I find it a bit more forgiving in regard to the chemical cleaning of a plate. Currently, I hand sand the plate to a satisfactory smoothness finishing up with 1500 grit papere, then clean it with Brasso, and do a final degreasing with full strength dish washing detergent rubbed over the plate paying particular attention to the corners and edges. I use Dawn detergent full strength. Most detergents are alkaline and with this final cleaning, you may see a blue color develop probably a copper nitrate formed by reaction of the copper with an ammonia solution to form a blue copper hydroxide. This is the same thing that happens when using Brasso to clean a plate and is probably the mechanism of the blue color that forms if you try using "new and improved" Pledge floor was as a resist. Then after a thorough final water rinse (front and back) dry the plate with Kim Wipes or lint free paper towels and apply the B.I.G. ground.

Grounds/resists:

I started out using Charbonnet wax hard ground and soft ground and also similar wax-based grounds from Graphic Chemical. These require the use of a hot plate with carefully controlled temperature and a brayer to spread the wax ground over the plate surface. The technique is not difficult to master, but something of a nuisance. Also, even the "hard ground" is relatively soft and can be easily marked or scratched in handling. After etching the plate, the ground must be removed to proof print the plate, and re-applied if a second etch is desired. But applying the wax over a previously etched plate is a bit more difficult due to the now irregular surface of the etched plate. One must work the wax into all the etched lines and areas then roll the surface with the brayer.

Also, at least in my hands, the wax grounds did not work well when first experimenting with salt etches, copper sulfate and ferric chloride. Performance was particularly poor on zinc plates etched with copper sulfate, where the etchant quickly penetrated the wax resist and resulted in "foul bite" all over the plate.

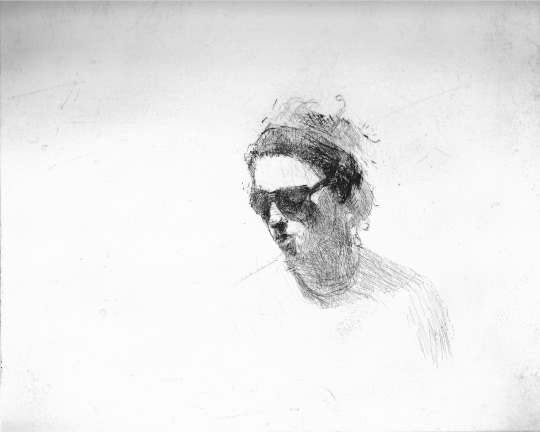
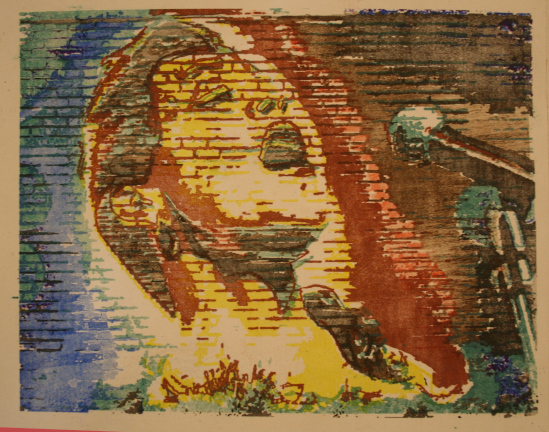
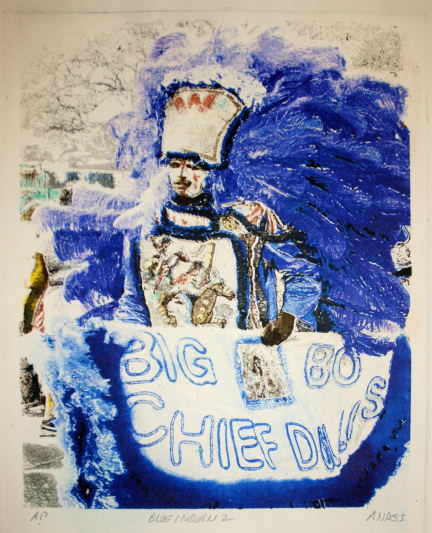
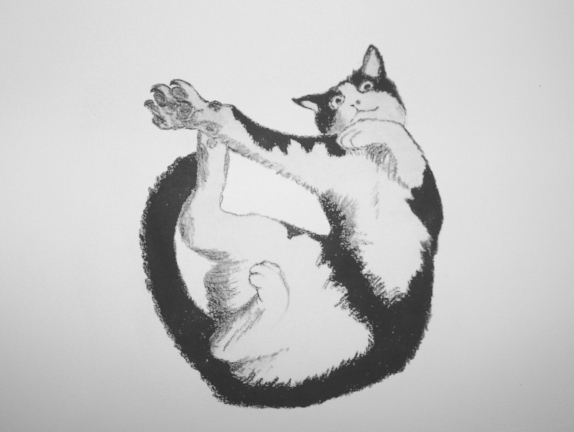
Here's an example of copper sulfate etch on zinc. This is by Rob and he has taken advantage of the extensive foul bite in the background for this image to create a wintry scene, but in other cases, the ground failed almost completely and I soon discarded this ground and the copper sulfate etch.

Winter scene - etching

B.I.G.

There are newer grounds which are easier to use. B.I.G. (Bigelow Intaglio Ground), formerly Bigelow Ink Ground, was developed by Andrew Bigelow of the Trefeglwys Printmakers. There is plenty of information about using this material online, both on their web site, YouTube, and Facebook. Just search under Trefeglwys Printmking.

BIG comes in a tube, which keeps it from drying out and makes it easy to dispense. Put a small amount on a glass work surface and use a brayer to roll it out, much as you would to condition any ink. Load the roller and roll the plate vigorously with firm pressure to apply a thin but uniform coating. It will have the eggshell appearance when properly rolled on.

At this stage, the BIG has the consistency of a traditional wax soft ground and can be handled much as a soft ground. Details on the technique are provided with the ground and in the online sources.

Once the ground is applied to use it as a hard ground it is necessary to bake the plate. A convection oven is best for this, but I use a conventional oven with temperature at about 270 degrees F. (use an oven thermometer to check temperature) and bake the plate for about 5 to 7 minutes. Longer times will harden the ground more and will make it more difficult to remove, but even the hardest baked ground will clean easily as described below.

Remove the plate from the oven and allow to cool completely and it is ready to go. The ground will harden a bit if the plate is stored for some days before using it, so with BIG, it is easiest to just prepare a plate when needed. Although I generally do five or six at a time and store them wrapped in newsprint and they are fine to use even weeks later.

I clean the roller and work surface with mineral oil.

Once the plate is scribed and etched, I remove the ground with hot water and washing soda or Brasso. If the ground is very hard, or I am in more of a hurry, I use CitraSolv. The ground also removes easily with denatured alcohol. This latter fact is particularly useful for I often coat the edges of a plate with stop-out shellac to prevent biting along them and also use the stop-out when doing a series of etches, as when lightly etching an area, stopping it out and further etching the rest of the plate. Also, when doing aquatint, the area that is not being aquatinted is protected with stop-out. Stop-out is shellac based and removes with alcohol. Also, for the spray-can aquatint technique, I use black lacquer spray, which also is alcohol soluable. So denatured alcohol makes a great one-stop cleaner for the BIG ground, the stop out, and the lacquer.

BIG has worked well with the ferric chloride etch on copper and is currently my go-to ground. One tip is to apply the ground as thinly as possible when doing delicate line work. You should be able to see the copper color through the ground slightly before baking. If you want a more robust line and plan to scribe the plate with vigor, the BIG can be applied thicker and baked longer. It is quite a flexible product and some experimentation will be rewarded.

Acrylic grounds

The newer acrylic grounds are easier to apply, more durable, and do not need to be removed when printing a proof. They produce a very hard surface and it feels very different when scribing a plate, as it is brittle and scratches and flakes away rather then having the smooth, easy, almost flowing feel of working a wax ground. The acrylic grounds cand also be used to make a very heavy etched line with the ferric chloride etch.

Z-Acryl

Z-Acryl hard ground was the first acrylic ground I used and it was my favorite. It was a modified version of acrylic floor wax with a bit of coloring added, but basically it was still pretty clear when on the plate and it is hard to see your lines when working the plate. There are various recipes for adding carbon black or black ink to the ground, but I found it easy enough to use strong side lighting to see the lines as I worked on a plate. I think of this form of ground as sort of "digital" and the was grounds as more "analogue", since when working a plate with the acrylic ground, a line is either there or not and it is harder to get the very fine lines and subtle gradations in degree of etch more easily obtained with the was grounds. That said, it is relatively easy to create differing depths of etch on an acrylic grounded plate through use of stop out and successive trips through the etching solution to produce the desired effect.

Z-Acryl was applied to a plate by pouring it over the plate, then standing the plate and allowing the excess to run off. The material dried very rapidly, so the plate was available in about half an hour.

Alas, Z-Acryl is no longer made or available.

For some purposes, ordinary Pledge acrylic floor wax will work. Pledge is the ancestor of Z-Acryl, and made by S.C.Johnson Company, whose chemists worked with Mark Zaffron to develop Z-Acryl. There are, however, many differing versions of the Pledge products. Put simply, acrylic "waxes" are generally removed by an alkaline solution. So "improved" acrylic floor wazes that advertise they also "clean" or remove old floor wax generally have some alkaline chemical, usually an ammonia, in them. And if applied to copper, the ammonia produces an interesting chemical reaction and etches the plate in an uncontrolled fashion. Recently, Pledge re-introduced its "original" formula, which seems to lack the alkaline component and will work as a resist. But if you choose to try this, here are a few cautions. First, read the label carefully and get the "original" formula Pledge. Second, remember the product will have various other chemicals, including some of the volitile organics that had been removed when the Z-Acryl was formulated. Adequate ventilation would be a must. And third, if applied too thick, this ground may flake or chip when scribing your image, making a wider or more irregular line than you desire.

Lascaux Hard Ground.

Lascaux Hard Ground is also a specially modified version of an acrylic floor wax. It has some white color added, but is still pretty clear when dried so it is sometimes hard to see your lines as you make them. As with Z-Acryl, some add additional color as carbon black or black ink to the ground, but these additives are difficult to mix in evenly and do not result in a very dense color.

To apply the hard ground, set the plate(s) vertical in a glass tray, leaning back against some sturdy support. Using the dropper/squirt bottle the ground comes in, flow the ground along the top edge, allowing it to run downward across the surface of the plate. This is where the care in cleaning the plate pays off. If your plate was clean enough for the final rinse water to "sheet" off, the ground will flow easily. It is sometimes necessary to use a soft brush to help it completely cover the plate. The goal is to make as thin a layer of ground as you can. The ground dries very quickly so you will have to move fast. Once the plate is covered, move it onto some paper towel, standing nearly vertically, to let the last of the ground run off and wick into the towel. When nearly dry, reposition the plate to a fresh towel, so it does not become glued to the towel. Allow the ground to dry overnight or for 24 hours before beginning to work on it. As you work on the plate some fine dust will accumulate, which can be removed with a soft brush or cloth .

When using an acrylic hard ground, the plate may be proofed after etching without removing the ground. The proof will look slightly different than an impression done after removing the ground because the depth of the line etch will be somewhat greater, due to the thickness of the ground. A little experience will inform you how to allow for this sight difference when evaluating a proof.

Acrylic grounds are removed with a mildly alkaline water solution. It is easy to make up a solution of one part dish detergent to nine parts tap water plus the addition of about one to two table spoons of soda ash (sodium carbonate or washing soda) to each quart of the solution. It is easiest to soak the plate in the solution for about 10 to 15 minutes, then gently scrub off the remaining ground. Wear gloves, as the soda ash is mildly caustic. Because the ground is clear, it may be difficult to see when it is completely removed, so more than one soaking may be needed.

Acrylic grounds also can be removed with citrus or soy-based solvents.

Acrylic grounds can also be used in an air brush to make an aqua tint. But this is a bit tricky as the acrylic solution dries really fast and it is hard to keep the air brush clean and open when working and it needs scrupulous cleaning when done.
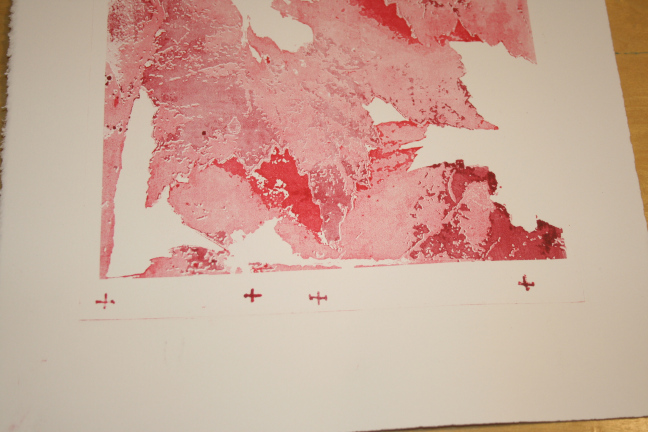
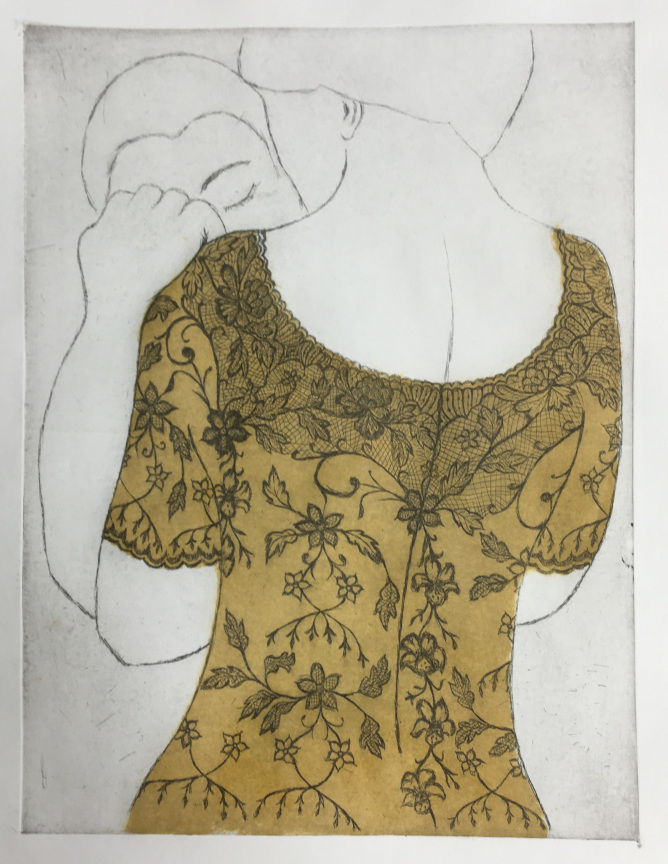
Aqua tint

Aquatint is an etching technique that produces areas of tone rather than lines. It is used most often in combination with traditional line etching to produce areas of shaded tone. It has also been used historically to print in colour by printing with multiple plates in different colours or by making monochrome black master prints with a second plate of aquatint used for the color areas.

Etching examples

Example of a plate which has been first etched then 
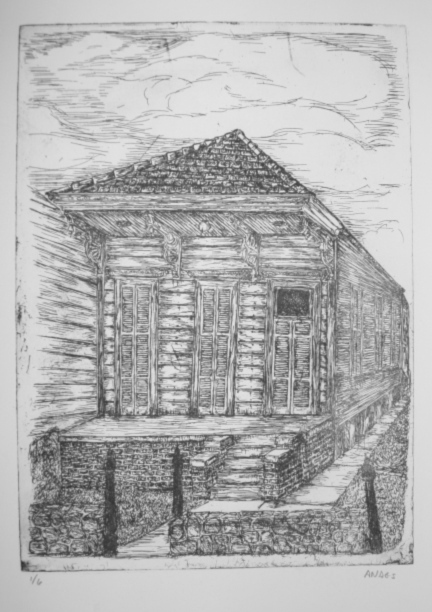
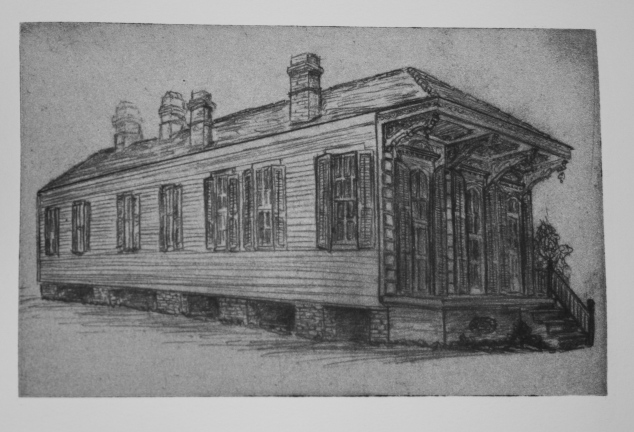
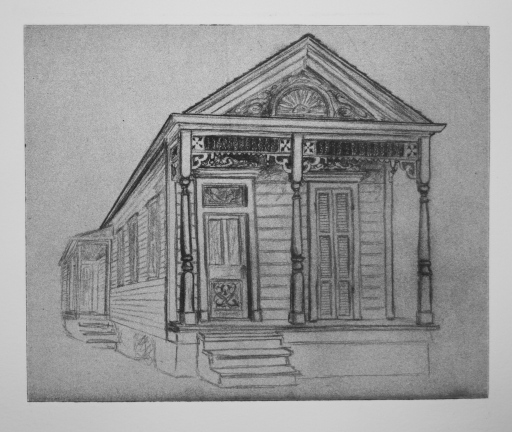
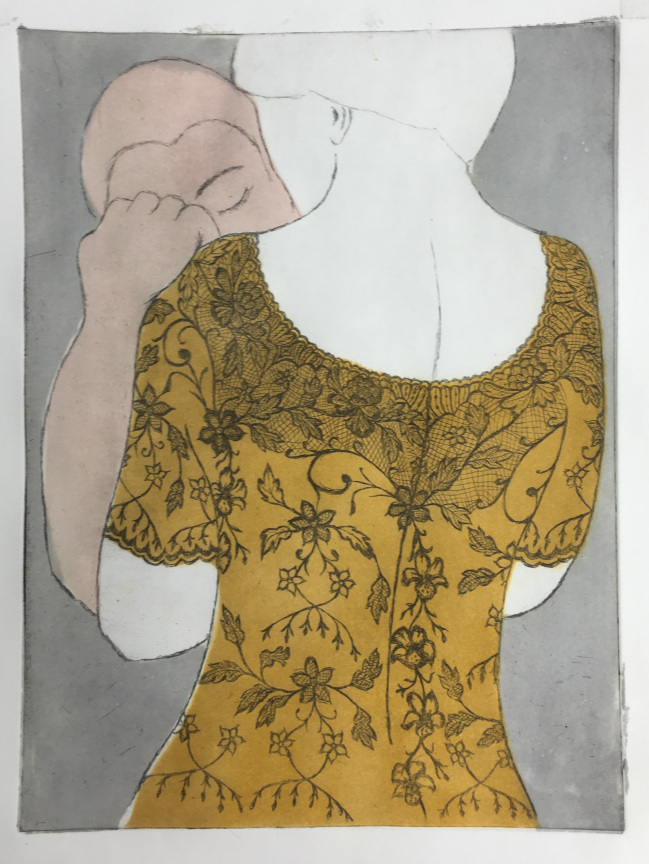
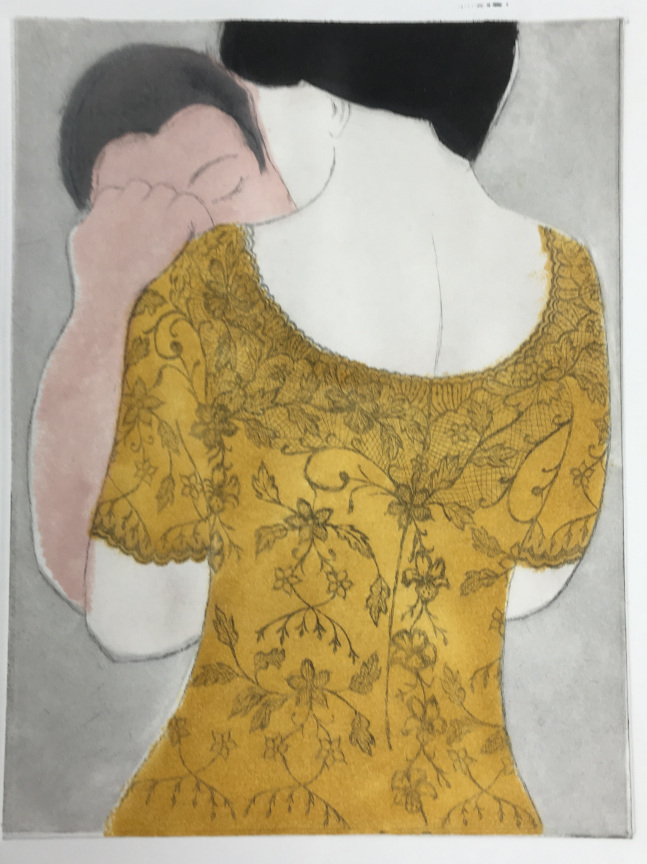
aquatint applied to the background and a second plate 
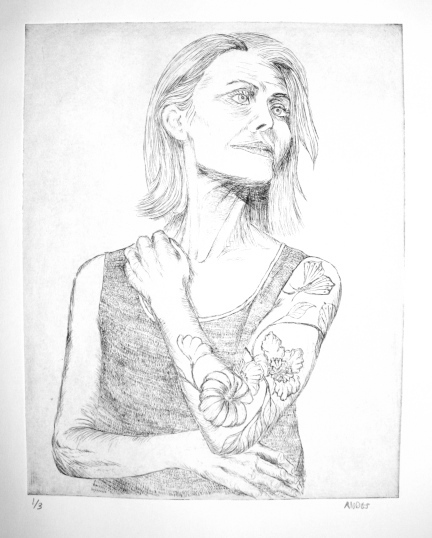
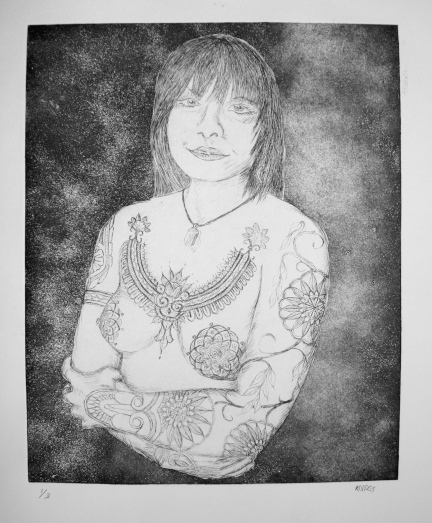
with aquatint area used to apply the color. The plates 
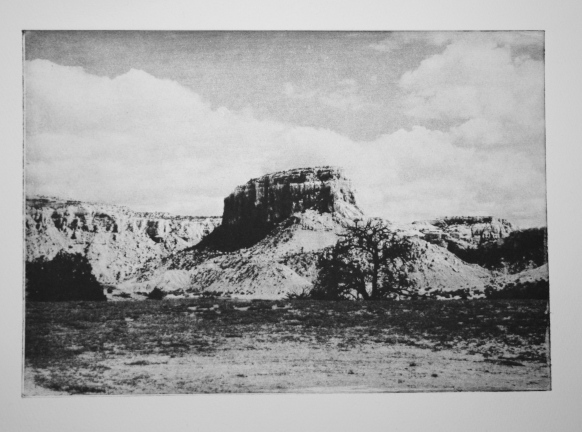
are copper, 9 x 6 inches in size. The first image is of the etched plate. The second image shows that same plate after three densities of aquatint are applied. The third image shows the addition of color by using a second plate with aquatint in just the areas to carry the color.

etched image aquatint added

color added

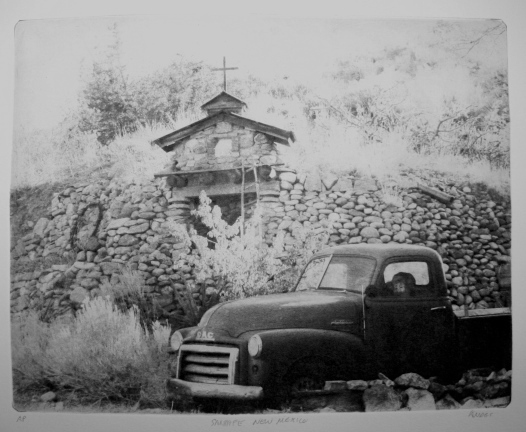
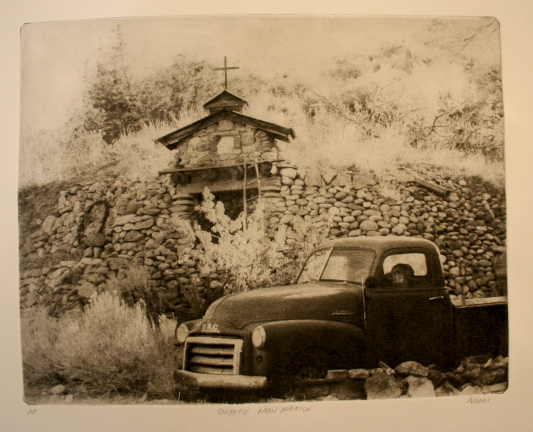
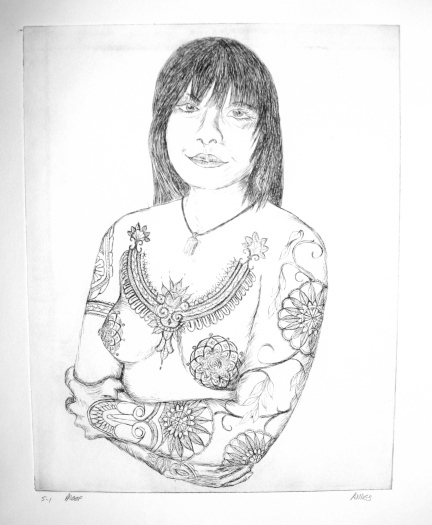
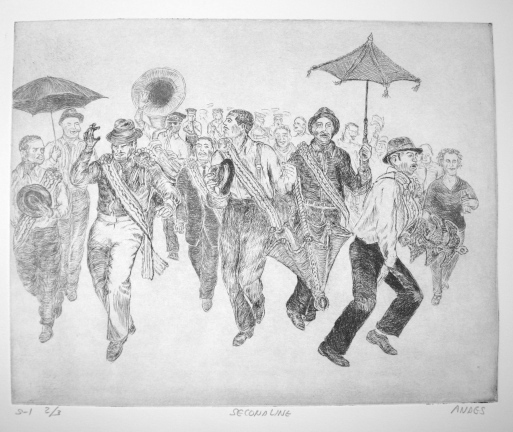
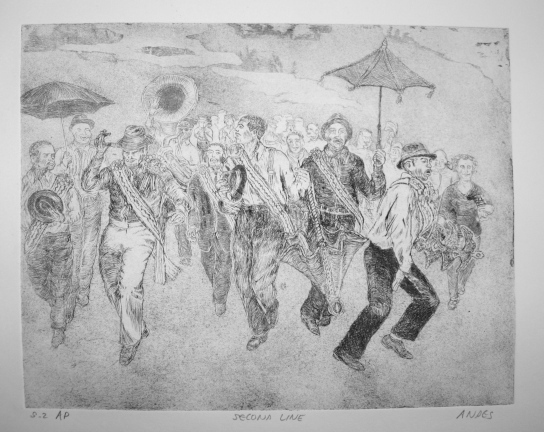
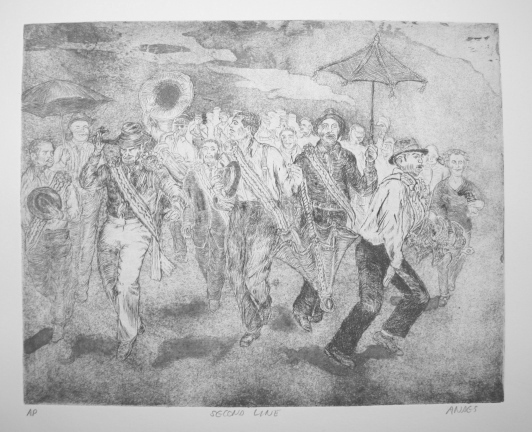
Here's another print with original etching done on copper. Then three additional plates were made for each additional color with aquatint used in the area to be colored. The plates are 12 x 9 inches. In the actual printing, the three color plates were printed first and the black master etched plate printed last.

etched plate first color

second color final colors

Aquatint was originally done using very finely powdered rosin which was hand dusted onto a plate, or placed in a special box in which air blown from a bellows would disperse a small amount of the rosin into the air inside the box, and the rosin would settle evenly on the plate. Once the plate was coated with rosin, it was heated to melt the rosin and adhere it to the plate, and the plate was then cooled and etched.

When combined with etching, the aquatinting was done after the etching. Areas of the plate that were not to be aquatinted were protected with a resist, such as shellac or similar liquid ground, termed a "stop out" and then the entire plate coated with rosin and etched. Only the areas not protected would aquatint. If darker as well as lighter areas of aquatint are desired, the first aquatint etch will be short, the plate removed from the etchant, washed, dried, and stop out applied to the lightest areas. The plate is then etched again, and the process repeated to make progressively darker areas of aquatint. For practical purposes, three levels of darkness of aquatint are about all that will be useful. When the etching is complete, the rosin and the stopout are removed with denatured alcohol, the plate cleaned, and then printed in usual fashion.

The areas of aquatint where the rosin was deposited and fused to the plate do not etch. The areas between the little drop-like rosin deposits will etch. And will etch deeper with each trip through the etchant. One limiting factor to the depth you can achieve with aquatint is the tendance of the etchant to also work sideways and undercut the edges of the deeper and deeper line. You can etch enough to begin to remove the protected rosin coated areas from below and beside.

The result of the aquatint etch is that there will be small drop like areas of un-etched copper surrounded by etching of varying depth. The etched areas will hold the ink. The un-etched areas will look white, resembling very fine drops of water on a dark background when the plate is printed. Hence the name, Aquatint.

Goya was a master of aquatint. Gene Kloss, of New Mexico, was a modern master of aquatint. Anyone interested in what aquatint can do should look at their work.

Aquatint has several disadvantages. One is that it is a very difficult technique to master using the old rosin method. And the rosin is a potent allergen as well. I use a simple spray can of black lacquer to coat a plate with a very, very light spray and aquatint that. It also removes with alcohol. Another disadvantage is that an aquatint plate is hard to ink and especially hard to ink consistently if doing an edition. And aquatinted areas of copper are not very durable, so the plate degrades quickly limiting the number of impressions attainable before print quality becomes unacceptable. Aquatint is also a "destructive" process, in that if you aquatint an etched plate, you cannot un-do the aquatint if you find it unsatisfactory or want to re-print some of the plain etched plate. So, if you plan to aquatint an image, either do the etching and print a full edition of it before placing the aquatint, or make a second identical plate and aquatint that to preserve the original etching.

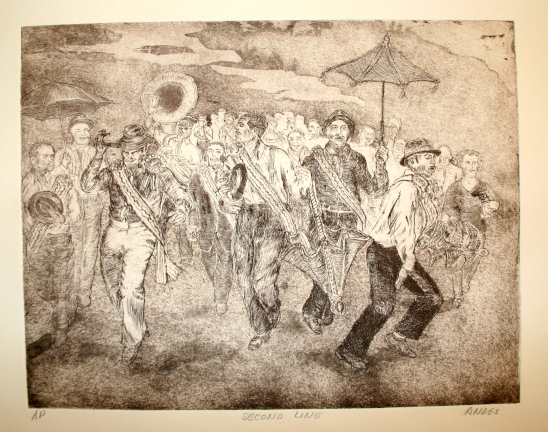
Below are a few examples of aquatint used in combination with etching.

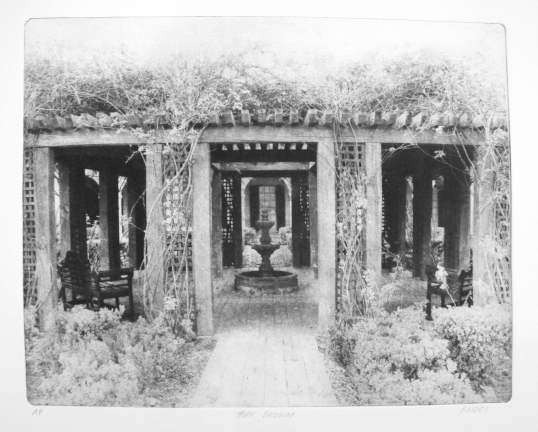
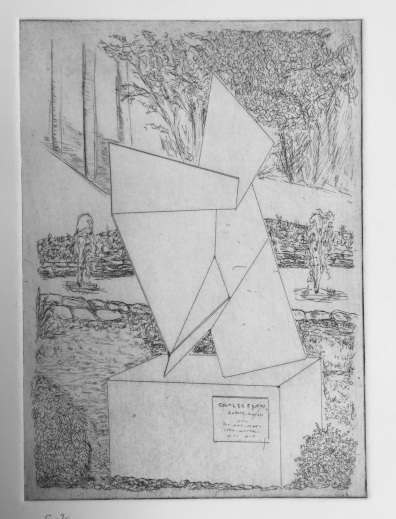
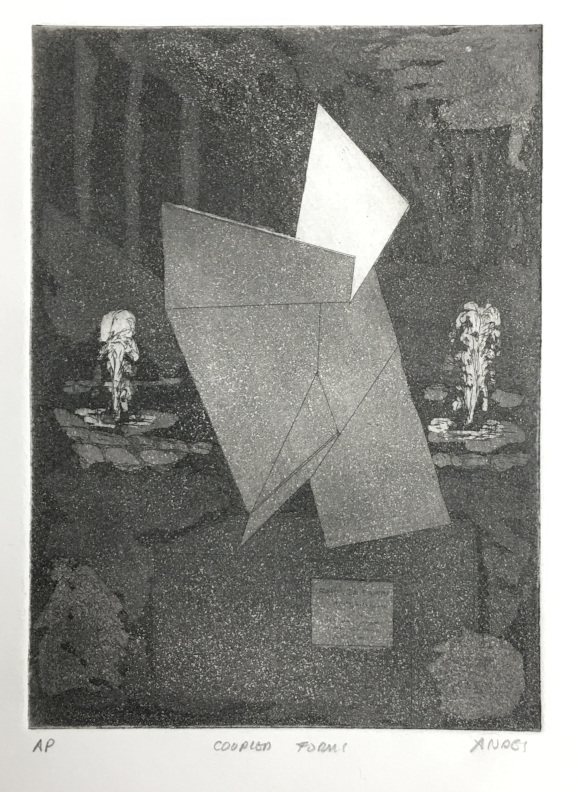
The first is an image of a minimalist sculpture called "coupled forms" by Arthur Silverman. Artie was a friend of ours from our first time in New Orleans and we were delighted to find this piece in the courtyard at Woldenberg Village when we lived there. The plate is 7 x 5 inches.

original etched image etching with aquatint

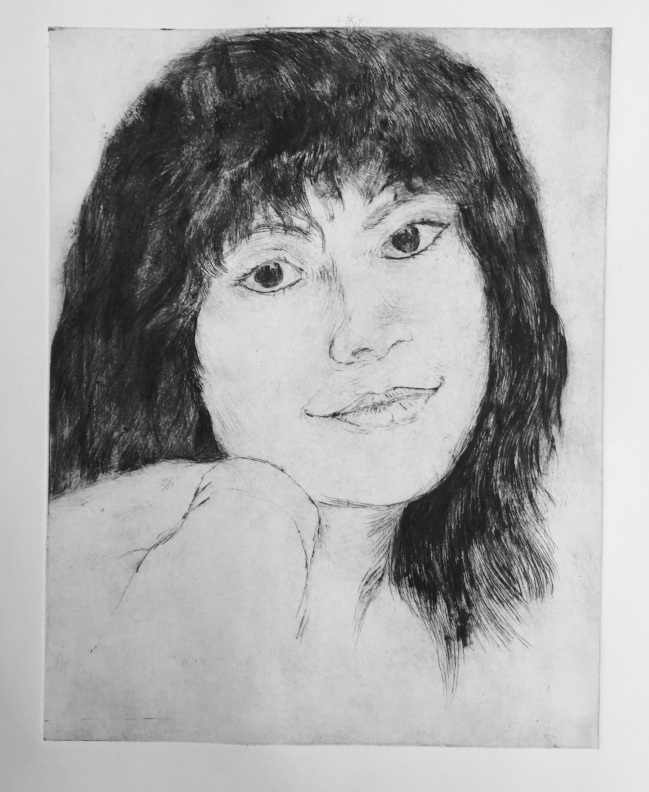
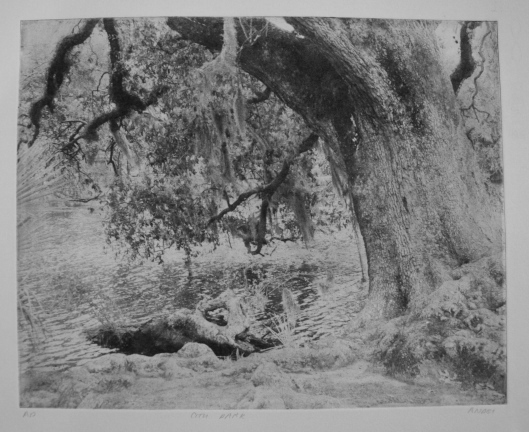
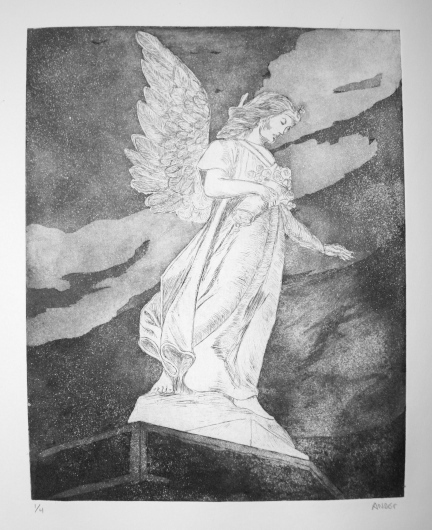
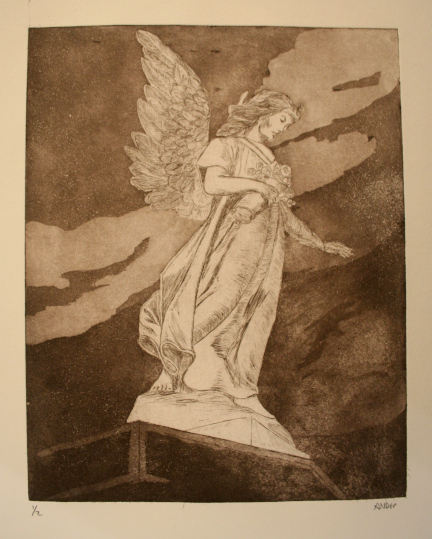
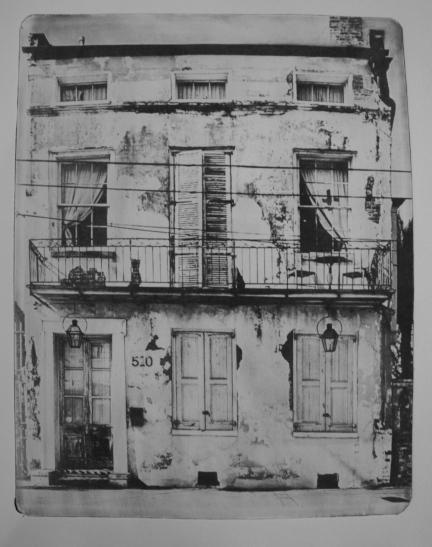
This is an image made from a photo I took at the Carrollton cemetery. Again, the first step was to make the line etching 
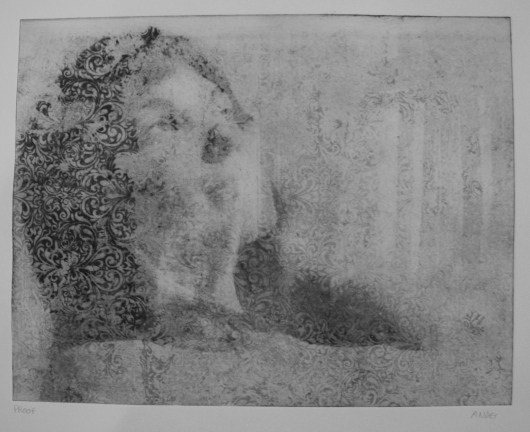
of the statue, then add layers of aquatint. I used the multiple shades of aquatint to not only make some shadows, but also to create a mysterious looking sky with scudding clouds. The plate is 10 x 8 inches in size. I printed it in black and sepia as you can see.

cemetery angel in black cat

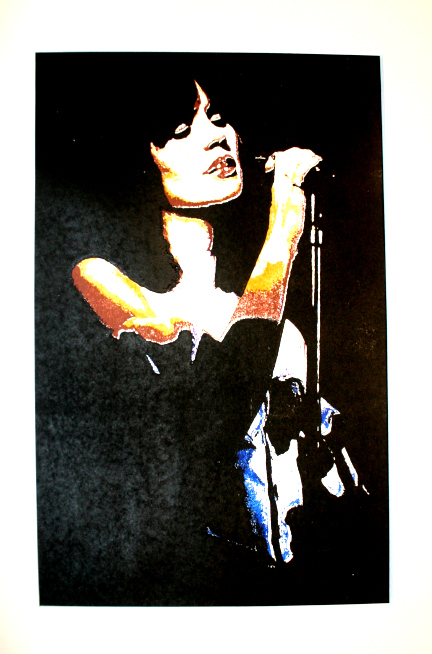
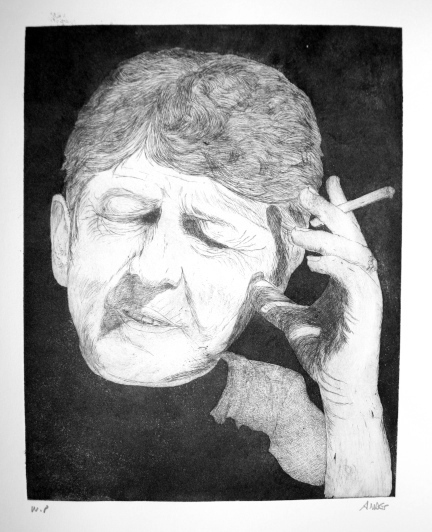
In this print, the aquatint is used to produce a heavy velvety black background and shadows. Again, two levels of darkness were created with differing times in the etchant after the spray-can aquatint was applied. In addition, when inking the plate, I took care to apply the ink heavily in the background and do minimal wiping in the darker areas. The plate is 10 x 8 inches. The original etching and the aquatinted version are shown.

etched image cat

You can find additional prints incorporating aquatint in the gallery of print images above. Here is one 
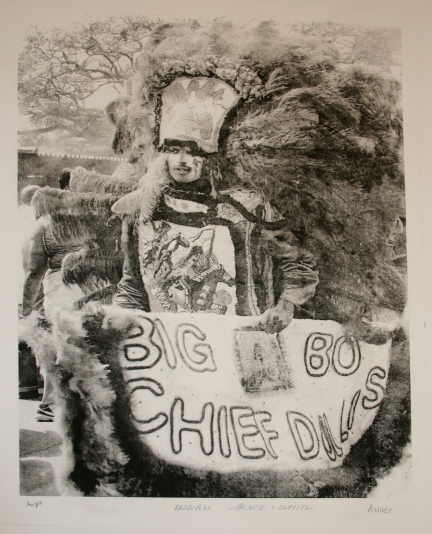
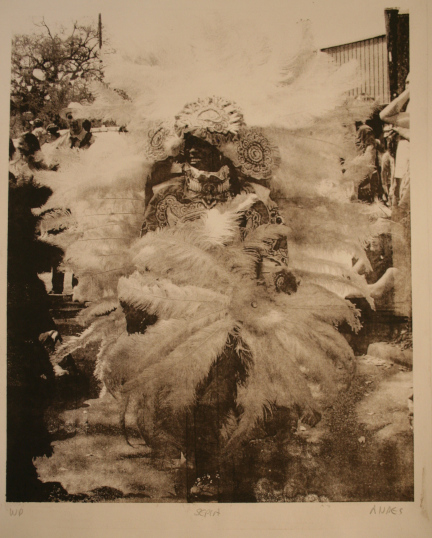
final illustration of the use of this technique. The first picture shows the basic line etching, the second the addition of layers of aquatint, and the final two show it after a little "spit bite" to create shadows for the "steppers". The plate is 10 x 8 inches and it was final printed in both black and sepia.

etched image aquatint added

final version in black final version in sepia

Ferric Chloride Etchant:

Chemical strength of Ferric Chloride solutions is somewhat confusing. The solutions are often described in terms of their density or specific gravity as measured with a hydrometer, rather than in concentration of the active chemical. Although fairly precise for some purposes, specific gravity, varies greatly with temperature and does not identify what is being measured. In the case of Ferric Chloride, suppliers often use a measurement known as “Baume”, which is just another version of specific gravity with a different scale developed in the 1700’s by a pharmacist named Baume. The density on the Baume scale is given as “degrees”. To further confuse, one scale is used for liquids lighter than water, a different scale for liquids heavier than water. Pure water has a Baume degree of zero, in contrast to the specific gravity system, where water has a rating of 1.0. All very confusing.

Many recipes for making ferric chloride etching solutions start with a saturated solution of ferric chloride, made by adding ferric chloride crystals to water. This reaction produces a lot of heat and is not advised as a way to make the etchant. It can be dangerous and is not a necessary way to do it, particularly when pre-made solutions are readily available.

Saturated solutions of ferric chloride will be about 40 to 44 Baume. There are two grades available: the technical solution, and the photo solution. The Photo solution will have fewer impurities and is recommended.

Graphic Chemical has Photo grade 42 Baume ferric chloride for very reasonable price.

The strength of the ferric chloride etchant will vary with the dilution used, but not in a linear way. Further complicating things is that the functional strength of the etchant will be affected by accumulating metal over time as well as other additives. The Edinburgh Etch was developed to increase the efficiency of the etching process by adding small amounts of citric acid to the ferric chloride solution. When using ferric chloride alone as the etching occurs metal accumulates along the etched line and slows the process. To counteract this, and to speed the process, the etching container needs to be agitated or stirred by aeration, or the etching done in a vertical tank to allow the metal to flow down and off the line. Adding citric acid helps with this issue, but does not eliminate it.

The etching solution I use is made as follows:

2 Liters Ferric Chloride solution (42 Baume Photo Grade from Graphic Chemical)
400 ml of distilled water
400 grams of citric acid powder (also from Graphic Chemical)

Weigh the citric acid on an accurate scale. The best place to get accurate scales that are not terribly expensive is on line at the American Weigh website. As a friend and mentor, Eric Thompson, once observed, one unintended consequence of the proliferation of the illicit drug trade in this country is the current availability of inexpensive and portable accurate scales capable of weighing very small quantities of material.

Weigh the citric acid and add it to the water. Stir until dissolved. It may help to warm the water slightly. When dissolved, add the citric acid solution to the ferric chloride solution.

Store the Edinburgh Etch solution in a plastic jug. I used the gallon jugs that the distilled water came in. Store at room temperature.

I now have a vertical plastic tank contining my ferric chloride etching solution, and etch my plates vertically. I use packing tape to attach the plate to a wooden rod (bamboo skewer) and then lower the plate into the tank using the rod, which then rests on the upper edge of the tank until the etching is complete. In between uses of the etchant, I keep the tank covered with a tight lid with a silicone gasket.

Before I had the vertical tank, I used Pyrex kitchen baking dishes as etching tanks with good results. Following is a description of etching in a horizontal tank.

To etch a copper plate, pour the etching solution into glass (Pyrex) casserole dish of proper size to hold the plate to be etched. Add enough solution to cover the plate. Slide the plate into the ferric chloride solution. For a typical plate, this etching solution (formula above) will take about 20 to 40 minutes to work. Agitate the solution by gently rocking the plate every 5 minutes or so. You can check on progress by removing the plate from the etchant, rinsing it with tap water, and drying it with paper towel.

The Ferric Chloride solution is not toxic, but it will stain just about anything an orange color which is permanent. This includes countertops, grout, clothing, and more. I generally put down several layers of newspaper to protect work surfaces before etching, wear gloves, and use sticks (bamboo skewers) to move the plate in the bath or remove it.

When the etching looks complete, stop the etch by rinsing the plate with tap water. Remember that ferric chloride will also etch other metals so if you are working over a metal sink, be sure to fully rinse off and wipe away any solution that has contacted the metal of the sink or faucets. Also, since household pipes may be copper or brass in the drain lines, flush the lines fully with plenty of water when the clean up is done.

After the plate has been proofed, and found satisfactory, pour the etchant from the casserole dish into a glass measuring cup, such as Pyrex one quart pouring measuring cup, and return the solution to the plastic storage jug. Under normal use for a single person shop, a gallon of etchant should last several years. Or longer.

When the etchant slows down or stops working, dispose of properly according to local regulations.

Notes on Inks

For printing copper plates I generally use Akua Intaglio inks, which clean up with dish detergent and water. The inks are soy-oil based, not water based, and are generally regarded as non-toxic, or at least less toxic than traditional oil-based printing inks. They are often referred to as water-based inks, but they are not. When I use the term "oil-based" ink, however, I am referring to the traditional linseed oil based printing inks.

Although Akua inks are regarded as less toxic than linseed oil inks, I am not certain this is completely true, as much of the toxicity of any ink is the toxicity of the pigment coloring agent and any additives and the toxicity of the solution(s) used to clean up. And all inks use pigments and dyes and most have additives. In the case of the older style printing inks, the oil used to formulate them was "plate oil", a linseed oil thickened by burning off the volatile components or evaporating them. Linseed oil is pretty much without human toxicity, much the same as the soy oil used in Akua inks, so there would be no difference in toxicity on this basis. Since I use mineral oil to clean up traditional linseed oil based inks, there is no difference based on the cleaning materials. Mineral oil has no human toxicity of note, so the difference between the two types of ink in my opinion is not based in toxicity, but in ease of clean up. If you avoid using solvents for cleaning ink, you should be fine using either type of ink. I do occasionally use traditional oil based inks when printing copper when I want a particular color or feel to an image, and in general, prefer them to the Akua inks, except when printing photogravure plates, where the thinner Akua inks work especially well.

Akua inks will get thinner in warmer temperatures, so if you need to thicken the ink, put it in the refrigerator overnight and it should thicken nicely.

To clean up Akua ink, use a solution of 1 part dish detergent plus 9 parts water. When cleaning heavily inked surfaces, such as a brayer or a glass inking plate, wipe as much ink off as you can with a rag or paper towel, then apply a heavy dose of the undiluted dish detergent and wipe it around for a bit, wait for a few minutes to letting it do the work of suspending the ink before adding water gradually to fully remove the ink.

There is plenty more information about the Akua inks on their site and from the many suppliers of their products.

One characteristic of the Akua inks that has implications, good and less good, in the studio is that they dry primarily by absorbtion and do not, for practical purposes, dry by polymerization or through evaporation. The good aspects of the drying mode of the soy based inks is that they will not dry on your worksurface when you are working and they will not "skin over" when stored in a can or jar. The less good aspect is that they will dry very slowly or not at all if printed in a very heavy layer or when they are printed on some surface which will absorb the ink poorly, as coated paper or an area of paper already printed with another color or another ink. Thus, for certain relief printing applications where a heavy dense black is desired, you may be better off using an oil based ink.

I use a lot of linseed oil based inks and really like them. Certainly when doing lithography, you must use an oil based ink, but I use them also for etchings and aquatint because they behave differently and dry better when they are applied in a heavy layer. I have used Charbonnel inks with excellent results, but now use inks from Graphic Chemical almost exclusively. One nice feature of the Graphic Chemical inks is that most of the colors are available in a cartridge as well as in a tube or a can. If you have spend much time in a print shop you are well aware of the tendency of oil based inks to form a dry layer or skin on the top of the ink in a can. And also of the various ways to prevent the skin formation, such as covering the ink with paper or plastic before closing the can. And you are also aware of the need to keep the ink cans covered when you aren't dipping out the ink. And the need to cover any ink exposed on the work surface if you are going to take a break. Ink in cartridges solves most of these issues. The cartridges hold about a pound of ink, as a can does, but they are sealed and the ink is dispensed by placing the cartridge in a standard caulking gun, cutting the spout, puncturing the seal, and dispensing the ink onto the work surface with the gun. If you also get the little plugs Graphic Chemical sells, you can immediately seal up the ink cartridge while you are working. You will still need to cover your work surface with some plastic wrap if you take a long break, but the problem of skinning in the can is gone.

Although Graphic Chemical and others make lithographic inks, I use their intaglio etching inks for lithography and am happy with them. Lithographic inks tend to be stiffer than etching inks and I have found the thinner etching inks to work better for me on polyester plates.

Even when printing only in black, there are lots of choices of blacks.Graphic Chemical has about a dozen different blacks. Bone black is generally a bit less opaque than other blacks and may be useful to use when printing a master plate in black over other colors. Carbon blacks and lamp black are more opaque and give an intense black. One of my favoite blacks is "renaissance black" from Graphic Chemical. It is their basic black with a trace amount of brown. When used on a warm white or light cream paper, it gives a warm image. In contrast, using a black with blue in it on a pure white paper will give you a cold image.

Printing the plate:

Printing an intaglio plate involves applyin a coat of ink to the entire plate, then wiping off as much as you can, leaving ink in the grooves and textures of the plate. Copper etchings are printed on a press under heavy pressure, using moistened paper and heavy weigh press blankets to force the fibers of the paper into the plate marks so the paper will absorb the ink.

There are as many ways to ink a plate as there are printmakers, or at least printmaking schools. Some use a piece of matboard or plastic to dip ink directly out of an open can and smear it on the plate. At the opposite end of the spectrum, some put a small amount of ink on a work surface and roll it out with a brayer before transferring it to the plate by rolling the plate. This latter technique has a couple of advantages, among them the "conditioning" of the ink that happens when it is rolle out and the fact that much less ink is used for each impression. My technique is somwhere in between. When using Akua inks, I leave the jar open and stir it frequently with a popsicle stick and use the stick to transfer a small dab of the freshly stirred ink directly to the plate. When using oil based inks, I will sometimes roll them out on a glass to condition them, but often dispense a small amount from a cartidge onto the glass and transfer to a plate with a stick. If the oil based ink is particularly stiff and hard to wipe, I may add a little extender to it, or work on a hot plate, heating the plate and the ink cartridge.

Once the ink is on the plate, smear it around using circular wiping motions and working the ink into all the marks and textures on the plate. Traditionally, a special cloth known as a "Tarlatan" is used for this. Tarlatan is an open plain weave cotton or muslin cloth that is usually heavily starched so it is stiff. If you buy if from an art supply house, it is expensive. The most important thing about it is that it is lint-free and does not contaminate the ink with small lint particles. I find you can substitute cheesecloth and if you change the cloths frequently, it does not produce lint of fibres. If you like, you can even starch the cheescloth with some spray starch to get that tarlatan feel.

Once the ink is spread over the plate, you use a clean(er) wiping cloth to remove the ink from the raised surface of the plate. There are differing opinions about the correct way to wipe a plate, and this means you are basically free to find the way that works best for you. I have found a couple of tips to share. As is often advised, it is good to wipe at least at first from the center of the plate to the edges using a moderate pressure.

Once most of the ink has been thus swept away, and the image emerging, adapt your wipe to the particular image and the desired result. The surface of a copper (or other metal) plate is not microscopically smooth, no matter how much you have polished it. The metal is a crystalline structure and under high magnification, the surface is marked with microscopic pits, lines, cracks and fissures, invisible to the eye. These tiny imperfections hold ink. The small amount of ink these hold is transferred to the paper during the printing and makes the "plate tone" or "plate blush". the slight coloring of the background of a print. By careful wiping with clean wiping cloths you can minimize or even nearly eliminate the plate tone, but it is often left as part of the finished image, and may even be accentuated by the way you wipe the plate. A glance at the various images of etchings above will show you differences in this background coloration.

The lines and textures of an image also my require special attention during this stage.

Dry point lines, for example, leave a slight sharp raised edge, a burr, which will hold ink as well as the line the tool made. This additional ink creates a fuzzy or blurry line and is characteristic of dry point. You do not wish to wipe away that secondary ink from the burr. Indeed, if you wipe too aggressively you can even wipe away the burr entirely, something which almost always happens when printing multiple copies of a dry point plate and which limits the size of an edition that can be printed from a dry point copper plate. Also, the burr of drypoint can catch the fibres of the wiping cloth and you need to take care to minimize or avoid this. Generally, a gentle wipe along the line rather than across it will be best.

Similarly, areas of aquatint require special attention. The ink is not held in discrete lines, but rather in a pit-like field punctuated by very small raised dots. You want to wipe just the very top of the raised dots, and leave the ink in the lower areas of the aquatint field. This is not easy to do, particularly when using a soft cotton wiping cloth, so sometimes it is better to do a flat wipe with a piece of newsprint, or ideally a page from a yellow pages phone book, if you can find one, using the palm of the hand. This is an attempt to prevent the wiping material from lifting the ink from the low spots. In contrast, if you are using the aquatint to produce a dense field of color, or a stark black, you hardly want to wipe the area at all, and may wish to add ink by gently daubing it with a used wiping cloth heavily impregnated with ink. Experience will be your best guide, but be comforted by knowing that any printmaker, or at least the honest ones, will tell you that printing aquatint is difficult.

Finish the wipe with a very light touch using a clean cloth and keeping the cloth moving as you move across the plate. Even a circular pattern, starting in the center will work. Then, use that cloth to wipe the edges of the plate, holding the plate aloft with one hand and running the cloth along each edge to clean it. There will almost always be some degree of marking from the edge of a plate, but it is better technique to keep that as simple embossing rather than a heavy ink line.

After time, it is possible to produce consistent prints from a plate and even produce an "edition" in which each impression is indistinguishable from another. After you have printed your edition, and several "artist proofs", dry and flatten them under weight, sign and number them, and you are done. Except, of course for the matting, framing, gallery display, and selling of them. Topics not included here.

When you have printed an edition from a copper plate, if you want to store the plate long term, clean it well and apply a coat of the acrylic ground, or or acrylic floor wax or spray it (outside) with some clear lacquer (caution: toxicity) to prevent corrosion and superficial scratching. Allow to dry and wrap in plain newsprint to store in cool, dry location.

Polyester Plate Lithography

Lithography, literally "writing on stone" is usually said to have been invented around 1796 in Germany by Alois Senefelder a playwright, who accidentally discovered that he could duplicate his scripts by writing them in greasy crayon on slabs of limestone and then printing them with rolled-on ink. He would have had to write backwards on the stone, of course, so I think he rather wrote in gease on paper, then applied the paper to the stone to transfer the grease, then figured out about the gum arabic solution, then printed the stone. So I supect the story of its invention may also be invented.

Lithography works because oil and water do not mix. In simple terms, an image or lettering is drawn (in reverse) on the surface of some suitable material using a fat or oil-based medium such as a wax crayon. A wide range of oil-based media can be used, but the durability of the image on the stone or plate depends on the material being used and its ability to withstand water and acid or alcohol. After creating the image or lettering, the plate or stone is treated with a solution of gum arabic, made from the sap of a tree and a form of glue or paste, plus a bit of nitric acid. This solution is repelled by the greasy image and coats the surface of the rest of the stone or plate with a layer of gum arabic, a water-loving chemical, which also fills up any of the fine pores in the surface of the stone. Thus, a printing surface is created in which there is an image which is water-repelling and a background which is water-attracting.

To print the lithograph, the stone or plate is kept wet with water, and an oil-based printing ink is rolled over the surface of the stone. The ink is attracted to and deposits on the image but is repelled by the water-coated background. The paper is laid atop the stone or plate and stone then printed in a press, which applies uniform pressure to the paper across the entire surface of the stone. Lithographic presses generally do not use the layers of felt blankets seen with etching presses and generally also use paper which is dry or only slightly damp, less wet than paper used to print an etched plate.

Whatever the actual origin and development of the technique, by the middle of the 19th century, it was a process widely used in commercial printing. It had the advantage of not requiring the use of movable type (and type-setters) and the advantage of not wearing out like a copper plate, so the technique could be used to make thousands of copies of an image or a page. But it had the disadvantage of being done on limestone blocks weighing hundreds and sometimes thousands of pounds and requiring that after each job, the stone needed to be re-ground to remove the image and painstakingly resurfaced to be re-used. And one stone was needed for each color in a multi-colored image. And that meant that lithographic printers needed especially rugged presses to handle the heavy stones. And rugged carts to move the stones around the shop. And heavy racks to store the many stones. And heavy buildings to house all the stones and heavy equipment. Lithography was not, at first, a practical technique for an artist to use in the small studio.

Paris had became a center for commercial lithographic printing by the time of La Belle Epoque, roughly 1870 to 1914. In a happy artistic and commercial collaboration, several of the huge printing companies there began producing the large multi-color advertising posters that soon became a hallmark of that era, and, at the same time, "collectibles". The print houses began having artists come to work in their print shops doing the drawings for the posters, and, it is said, the artists began to limit the number of images printed from a stone, further increasing the collectible value.

Later in the 19th century, there were other important advances in commercial lithographic printing. These included the development of lithography on metal plates, now usually aluminum. This involved treating the plate with chemicals or some mechanical means to produce a microscopically rough surface with a "tooth" that would hold water. This prepared surface could then be used much as the original limestone surface, but the aluminum plates were much easier to handle and, in addition to being usable in lighter presses, they could be rolled onto a roller and used in the newly developing rotary presses.

The other significant development in printing incorporated photographic techniques to produce the image on a lithographic surface. These techniques plus the development of color separation techniques using filtered light let the industry explode into producing full color printed materials at lower and lower costs.

And before long, the plastics industry developed polyester plastic sheet with a "tooth" surface suitable for lithography. These sheets are now commonly used in commercial printing. Images and lettering can be created by digital printing in a laser printer and also by directly drawing on the plastic sheet surface. The texture of the sheets is similar to the frosted Mylar sheet used for drawing.

In the art world, lithography of polyester plates also became popular. There is plenty of first hand information about the process available on line with a simple search. One brand of polyester plate was known as the "Pronto Plate", and is commonly available. The first polyester lithographs I did used Pronto Plate materials.

But like a lot of things in the art world where anecdote often substitues for evidence, you will find the information you turn up sometimes confusing at best and often contradictory.

Following are some tips and techniques I have learned, largely through trial and error, and after many mistakes.

Making a plate using a laser printer or copier.

When making a lithographic plate using a laser printer, there are a few things to remember.

You can make the image by printing it from a digital file using a laser printer. For example, if you have a drawing you wish to convert to a print, you can take a photo of the drawing, transfer the photo to your computer, manipulate the photo with GIMP or Photoshop, and print it directly onto the lithographic plate in a laser printer. When working with the photo in the processing software, work with a resolution of at least 300 pixels per inch.

There are a few caveats about printing the plate.

You will need to set the printer to produce an image at an appropriate resolution for hand lithography. Laser printers (and copiers) have different setting for parameters such as "dots per inch" and "lines per inch" as well as different ways of "dithering" the dots the printer makes to produce blacks and half tones. These settings will greatly affect the ease of printing of the image as well as the quality of the finished product. In general, a setting of 1200 DPI will be suitable for a black and white halftone image, but you will need to experiment with your particular printer. Also, the printers have different settings for the type of paper being used and you will need to select something more appropriate for the polyester material. "Rough paper" works in mine.

Laser printers and copiers do not use ink. They use "toner", which is an extremely finely powdered plastic that is deposited onto the paper (or the polyester plate) and then heat-fused to the paper by a fusion roller in the printer. Which is why copies made in a laser printer are warm when they come out. But the temperatures reached in a typical laser printer are often not high enough to fuse toner to a polyester plate. So, as you print, the image will quickly degrade and erase with each time you roll over it to ink. Therefore, you must heat treat the laser printed polyester sheet to set the toner. I have used a heat gun or a hair dryer, but find that difficult to control. A better approach is to place the plate on a sheet of newsprint and bake it for about 3 minutes in an oven at 250 degrees. Again, you will need to experiment to find the right settings.

Another way to make a polyester lithographic plate is to use a laser copier to copy an original image, such as a drawing, onto a plate. There a few issues that arise when using this technique, including the matter of handling a very large original, re-sizing an original, and managing the print output settings of the copier. If working at a Fedex-Kinko's you will need to find some helpful staff to assist.

Here are a couple of lithographs made from charcoal drawings of cats. The prints are from a polyester plate 8.5 by 11 inches printed on 11 x 15 paper. The orginal drawings were on 8.5 x 11 paper.

cat cat

Lithographs from Photographs

You can also make lithographs from photographs. Probably the easiest way to do this is to bring the photograph into your computer and handle it as above, working at 300 P.P.I.

Make the plate in the same manner as described above.

Here are a couple of lithographs made directly from photographs. I converted the original color photographs into black and white and worked from there. The plates were 8 x 10 inches. One was printed with black ink, the other with a sepia ink.

indian in black and white indian in sepia

One particular advantage that lithography has over etching as a printmaking technique is that with lithography it is possible to capture the soft, feathery texture of a line drawn with a pencil, or a crayon, and similarly, the watery, washed effect of brushed ink or water color pigments. This is particularly true when you work by drawing the image directly onto the polyester plate. Following are some notes on that techigue and some lessons learned, especially about the printing of a plate.

The polyester plates can be drawn on much as other media used for lithography using many of the same materials. Lithographic crayons work well but generally don't produce a line or image with enough durability to be satisfactory. Permanent markers also work, but produce lines and effects more like pen than pencil. The "ink" used in markers is similar to shellac and thus can be degraded by wetting (Fountain) solutions containing alcohol and certain other solvents. Oil based paint also works as well and can be brushed on for certain effects. The class of greasy liquids, or solids intended to be suspended in water that are classed under the term "tusche" offers a wide range of possibilities. If interested in the various forms available and their uses, refer to the Graphic Chemical and Ink web site, particularly the sections describing the Lascaux tusche family. Note that many are not formulated for use on a lithographic plate, but are used in making a drawing that will be reproduced through photographic means, either photographic based lithography or photogravure, the process described later.

If you want to work by drawing directly on the lithographic plate and are using polyester plates as the base, here are some tips and background information to know about how to handle the plate when printing.

First, some notes on "Fountain Solution". In commercial printing, the water used to wet the plate before rolling on the oil based ink in the early commercial presses was sprayed onto the plate. The sprayers used for that purpose were called "fountains" by the pressmen and the solution used to wet the plate became known as the "fountain solution". Through the years and through experimentation, commercial fountain solution became a sort of witches' brew of chemicals, often a proprietary mixture. This was because when printing commercially, especially when printing large numbers of impressions of a plate at one time in a continuous process, the ink, which was applied by a rubber roller, would begin to behave differently. This change in the ink was probably due to a couple of factors. The ink would pick up some of the water from the wet plate over successive impressions and that water could mix with the ink, turning it into a form of emulsion and changing its affinity characteristics, making it less hydrophobic and lipophilic so it tended to stick less well to the image and adhere to some degree to the water-wet background. The reason the ink roller picks up water is that when water is spread over the entire plate, it does not spread evenly and absorb over the image as it does over the background, but "beads up" and can be then picked up by the roller. In addition, over time and successive impressions, the ink might tend to accumulate in excess amounts on the image, especially in areas of dense color, a situation called "scumming". In addition, the chemistry of the plate itself might change and the

Fountain solutions today contain additives to counteract both the chemical mixing of water with the ink and the tendency of the ink to scum on the image as well as chemicals to help the water spread better over the surface of the background and absorb into it better. There are many different formulations of fountain solution available today, but most of them contain a significant proportion (up to 20%) of isopropyl alcohol or glycerin, as a less flammable substitute. Many also contain gum arabic to promote the water stickihg better to the plate. Since many commercial printing presses use aluminum plates, there are also often chemical salts intended to clean and maintain the surface of the aluminum.

I use a commercial fountain solution for printing polyester plates that have been imaged in the laser printer and then baked to fuse the toner to the plate completely. And under those circumstances, that solution works very well at preventing emulsification of the ink with water and in preventing or removing scumming.

However, if you draw on a polyester plate with a lithographic crayon and print that image using commercial fountain solution, the image will quickly degrade as the alcohol or other solvent in the solution will strip away the image as you roll up the plate with ink. This degradation will be evident after only a few impressions. There is some difference between images made with differing crayons, which differ in "hardness" or greasiness, but none will work satisfactorily with the commercial solution. The same is true for images made with markers, as the shellac based "ink" is somewhat soluble in alcohol, although less so than the crayons.

So when printing a plate with and image drawn with crayon or marker or other ink, do not use a commercial fountain solution. Instead, use either plain water or a solution containing gum arabic. The solution I use with good results has the following formula. The gum arabic solution and citric acid crystals I use are from Graphic Chemical Company.

Distilled water 1 litre (or one quart)
gum arabic solution 75 ml
Citric Acid powder 30 grams

The same solution can be used to print the laser generated plates avoiding the use of commercial fountain solution and exposure to the chemicals therein completely.

Printing in Color

As mentioned above, after half-tones, the second desire of printmakers was (is) color printing. The examples of colored images above under the etching section use multiple plates to produce colored images, one plate for each color. The registration was done as described below.

As soon as you are making a print with multiple plates you encounter the issue of "registration" or alignment of the plates (or paper) with successive runs through the press. There are two basic ways to handle registration.

The first way involves some system for guaranteeing that each plate is aligned exactly the same way on each piece of paper in the edition every time a color or the master plate is printed. This can be done several ways and will be discussed below.

The second way is to design a multi-colored image in which the precise alignment of the colored areas is not at all critical or even necessary. This pretty much avoids the issues around registration and won't be discussed further other than to say it is much the smarter and less stressful way to approach the matter of adding color. Highly recommended.

Registration systems

The simplest and most common approach is to use markings on the press bed to tell you where the plate is to be positioned and where the paper is to be placed. Since the paper is always larger than the plate, this system works only with the inked plate placed on the press bed first and the paper placed on top of it, facing down. It required that, when using multiple plates, the plates all be of exactly the same size or the markings adjusted for any size differences, and that the paper all be the same size. Presses often have a clear lexan cover installed over the steel or other press bed, and it is common to have a paper registration grid fastened beneath the lexan as a guide to positioning plates and papers. One can also mark the bed or the lexan to indicate the position of plate and paper, either by using a marker or with tape.

Takach press sells a registration grid which is a magnetic surface and has registration markings on it. This magnetic grid is really handy when printing polymer etching/gravure plates, as they are steel backed and are held tightly in position by this grid. Here's a photo of that grid. You can see it is scaled out from the center, which makes it easier to center paper over your plates.

Takach registration grid

Another way to positon plates and papers with proper alignment is to use a pin registration system. This involves working with plates and papers that have been punched with holes that align with shallow pins placed on the press bed. The pins are available from Takach and from Dick Blick or you can make your own. I use a heavy duty two hole punch set to a standard width to punch holes in the (polyester) plates and the paper. Then to print, I place two pins into the holes in the first plate, lay the plate on the press bed, and tape the pins down to the press bed. Then, for each impression and for each color plate, I place the inked plate on the pins, the paper on top and go. This system, if done carefully, produces good registration results. This method of registration is limited to plates that can be punched with a hole punch, which pretty much rules out heavier metal plates, such as the steel backed photo polymer plates and the weight of copper that I use, but it works well for the polyster lithographic plates and with some tricks, can be used with the metal plates also. The paper used needs to be oversize to allow the area where the holes are punched to be trimmed off. Overall, a great registration system for the small shop, but there are some cautions, mostly about the paper, as will be discussed later in that section.

When using the pin registration system with polyester plates, make up the plates allowing about 2 inches extra on one side of the image, usually the top. This is the area where the holes will be punched. Similarly, tear the paper similarly over size in the same dimension. Make your plates, one for each color, with the image in the area below the extra two inches mentioned above. Once the images are made and stabilized, by baking for laser printed plates, or by drying for 24 hours for drawn plates, align the plates on a light table by stacking them. I generally start with the master (black) plate, then add and adjust the position of the first color and tape it to the first plate, then do the same for the second, third, fourth, etc. plate, so that all are precisely aligned and taped together. Then I punch them all at once, taped together. Then I punch the prepared paper (see below).

Once the plates and paper are punched, the printing is pretty straightforward. Start by placing one of the plates on the press bed and inserting two pins into the holes of the plate. Tape the pins to the bed with a good tape. I use "binding tape" which holds up to the water well and removes easily. Then remove the plate.

Here's a photo of the pins (home made) taped to the press bed.

registration pins on press bed

Once the pins are placed, ink the first plate, place it on the pins, put the paper on top and run it through the press. When printing polyester plates, I use several layers of heavy paper to back the paper and omit the press blankets or use only the pusher. And print with moderate pressure, less than for an etching.

Allow the first color prints to dry overnight and print the second color. Repeat until you are finished.

Although polyester plates can be cleaned and saved and re-used, I usually discard them after the first use. They are cheap to purchase in quantity and I rarely return to re-print an edition anyway.

Notes on inks here.

Another method of aligning plates and papers is to use markings on the plate which are printed onto the paper and then later removed when the print is trimmed. This is a system commonly used in commercial printing and involves the alignment of successive marks with each color being printed. It works when you can precisely line up the paper and hold it in place when printing and the plate is always in the same location relative to the paper. However, this system can be used in printing polyester plates by taking advantage of the fact that the plates are transleucent and a mark on the plate, as well as the image, can be seen from the back as well as the front of the plate.

Here are some pictures of a print in process showing this method of registration. The first picture shows an impression with the alignment marks printed on it. The second picture shows a plate with the alignment marks made on the plate with a marker, which alignment marks will print onto the paper. The third picture shows how a plate (face down) can be properly and precisely aligned on the paper using the marks as a guide. Here the transleucent polyester plate makes this method possible and easy.

interim print with registration marks Plate with registration marks

Plate aligned atop the print

photos

Photogravure/Photo Polymer Techniques

Photopolymer etching is regarded as a non-toxic etching technique, because the plate consists of a light hardened polymer coating on a metal backing plate and the image is created by exposing part of the plate to light, hardening it, then using tap water to wash away the un-hardened parts of the plate, which then hold the ink to make the image. The technique can produce a wide range of half tones, as the polymer hardens to the depth that light penetrates is and thus an area exposed to less light hardens to less depth and produces an area that hold proportionally less ink than that which has not hardened at all.

During the washing of the exposed plate with water, however, there is a noticible pungent volatile chemical odor. I have not been able to find out what that is, as the un-hardened polymer formulation is proprietary information, but would recommend working with good ventilation and wearing your shop nitrile gloved when washing a plate.

My first experiments were with the old style "Solar Plates" exposed to sunlight using a transparency with a covering sheet of window glass clamped to the plate on a backing board of plywood. It worked fine for a series of simple line drawing based on pen sketches. I did not attempt any images with half tones using these plates. In recent years, a thicker polymer coating was developed for Solar Plates and they were used in a gravure like process, but Solar Plates are no longer made or available.

When I started doing photogravure in Santa Fe, I use KM-43 plates, which are one of a series of commercial photopolmer plates made by Tyobo. The KM plates I am using now are KM-73. the KM 43 has an photopolymer coating that is 0.43 mm (0.017 inches) thick. The KM 73 plate has a polymer thickness of 0.73 mm (0.028 inches), both on a steel backing plate. The thicker polymer may give a greater range of halftone shades. It is often used in the letterpress industry to create relief printing plates, especially of images.

When working with these plates or any other photopolymer plate, the plate must be exposed to consistent, measured amounts of Ultra Violet light to properly harden the polymer. This UV exposure is done in an "Exposure System". I use a pretty old NuArc 26-1K machine, which has a mercury vapor lamp bulb as the UV source combined with a UV light meter which totals up the amount of light given off by the bulb over time all built around a large (26 x 26 inch) table with a vacuum system to compress the plate being exposed to the transparency with the image to be created. The particular machine I have was supplanted many years ago by a similar machine using a "metal halide" bulb in an otherwise identical system. Both these types of units were widely used, often in the T-shirt silkscreen industry, and have been replaced by newer units and are no longer made. There are, however, many around and occasionally available, as well as replacement bulbs and some parts.

These systems operate by setting a number to quantify the light exposure. That number is not a time. It is some otherwise undefined measure of the amount of UV light the target light meter has recieved. Since, at least in the mercury vapor systems, the amount of UV light given off differs over time, timing is a poor way to measure exposure with these bulbs. When the bulb is activated, the mercury is first vaporized by an electical discharge, then further electrified to increase the light given off, much like a fluorescent or neon light. So at first, it emits little UV light, then gives off more unti a plateau level is reached. These exposure units measure the total light given off, not the intensity at any particular time. So the numbers quoted below in describing use of my particular unit reflect the total UV light given off. The time to reach that total varies and is unique to that unit, to the bulb currently in the unit and the age of that bulb. Each unit should be tested and calibrated for use with each type of photopolymer plate in each studio to achieve desired results.

When I moved my unit to the current studio, I also changed from KM 43 to KM 73 plates. Here are some of my shop notes and results of experimentation to determine the proper UV exposure "dose" for the particular photo polymer plates (KM 73) I am currently using.

Prior to trial exposures, I checked various on-line sources which proved to be inconsistent at best. Some of the descriptions of calibration of exposure used different plates including Solar plates and variants, or other KM products, such as the KM43. The sources of UV light also varied from home made light boxes of varied capacities to commercial units such as the NuArc 26-1K (Mercury) device and the NuArc 26-1KS (Metal halide) device. The home made devices and some commercial units exposures were measured in time. Both the NuArc units have light measuring devices that aggregate the total exposure to UV light and are calibrated in arbitrary "exposure units" rather than time. In the case of the Mercury unit, at start up, the liquid mercury is first vaporized with an electric charge and then the bulb begins to emit light in a more consistent fashion, so the actual exposure varies over time and the measuring device on the unit is the only way to gauge the actual UV exposure, as time is not reliable.

In addition, descriptions of how to use the Stouffer 21 step guide varied as well as the intended results, with some "authorities" suggesting that a "full black", defined as loss of all emulsion on developing the plate should occur at about step 8, while another recommended that occur at step 16. Note that loss of ALL the polymer and exposure of the underlying steel plate is highly undesirable and to be avoided when making gravure plates. This is one confusing bit of information about using the Stouffer Guide.

To print black with a photopolymer plate, the plate must be exposed to an aquatint screen either before or after exposing the plate with the positive transparency used to generate the image. None of the material found online fully addressed the impact of this secondary exposure of a plate on the determination of exposures to use. The aquatint exposure is necessary to prevent the total removal of the polymer emulsion from the plate, which would produce a sort of "open bite" and result in an unprintable area rather than the desired full black.

Online authorities differ in how much exposure to an aquatint screen is necessary. My rule of thumb is to expose the plate to the aquatint screen first for an exposure amount that is one half the time planned for the transparency when working with a typical image with lots of half tone areas and noticable white areas. For a plate with significant black areas and half tones in the darker range, expose more with the aquatint screen up to the same amount of exposure planned for the image transparency itself. Typical exposures in my studio with our NuArc 26-1K machine using KM 73 plates are given below.

Following are results of experiments in my shop using a NuArc-1K unit and KM73 photopolymer plates. Trial transparencies were made from photographs using GIMP and printed on Pictorico transparency film with an ink jet printer. These notes are not offered as anything authoritive but are offered as possibly helpful to someone needing to calibrate a unit and wishing to avoid the waste of time and expense I endured.

I defined the "inflection point" on the exposed plate after wash out (developing) of the plate as the Stouffer Gauge step at which the emulsion is completely gone.

Test exposures with the Stouffer 21-step guide showed that an exposure of 20 Units produced an inflection point about step 7/8 on the Stouffer Scale. Exposures of 80 Units will yield inflection at Step 11/12, of 320 Units inflection at step 15, and of 640, inflection at step 16/17. Note that the testing began with 20 Units and increased by a factor of 4 in subsequent exposures, as suggested by the Stouffer Guide, to shift the inflection point by about 4 steps with each increase.

Next, a series of plates were exposed to an aquatint screen and then to positive image transparency. The first plate exposed at 649 Units for both screen and image and was very over-exposed, that is, the polymer emulsion was completely hardened over the entire plate. The second plate, exposed at 320 Units was similarly overexposed, with no significant difference between the two exposure levels. These two experiments pretty much blew away the earlier calculations about exposure quantity derived from the Stouffer guide.

Conclusion: the working exposures of screen and print should be much less than that suggested by the Stouffer Guide experiments, and likely the final working exposure would be the total of the two exposures and be somewhere around 80 (total) at most. The exposure quantity determined from experiments with the Guide likely represents the total exposure, aquatint plus transparency, for a plate.

I then remade the transparencies for use in the next round of testing, increasing both the black level and the contrast in the transparencies. One image had a lot of black and a darker range of half tones, the other was the opposite, with much white and lighter half tones. Originally, I had made transparencies using the "levels" settings in GIMP to decrease black level and white level, thus narrowing the contrast range largely to the middle range. This technique had worked well in the past but seemed to be yielding low-contrast results this time. This time, I set the black level to be as opaque on the transparency as on the Stouffer Guide, a full, opaque black.

Then, I exposed my two experimental plates to aquatint screen and image at lower total levels. First, 40 Units for screen, then 40 Units for image with resulting plate still slightly overexposed and lacking detail in the grays. Then, 20 Units for screen plus 40 units for image with acceptable results. When printed on Stonehenge paper the plate yielded good black with nice aquatint effect and an acceptable range of detail and levels of gray in the mid range tones.

Conclusion: For plates with large areas of black or darker gray areas that will need good aquatint exposure, 20 Units for the screen and 40 units for the transparency was a good starting point. This does produce some aquatint effect in the gray tones and does not make a stark white, however. Depending on the subject, the aquatint exposure can be reduced. For plates without large areas of black or dark gray and a good range of grays and white, the 20/40 combination should work, again with the provision that the aquatint screen exposure can be lessened.

Here are the two images I used in the experiments above. One primarily white/light and the other primarily black/dark.

light image

dark image

Comment: I am currently using somewhat reduced exposures at 16 and 32, depending on the particular image. This latter exposure level is closer to what I used in the past with a different NuArc-1K machine and KM43 plates (12 aquatint plus 16 to 20 for the transparency) and would be consistent with the higher exposure levels said to be required for the thicker KM73 plates.

Samples of the prints made using both KM 43 andKM 73 plates and the NuArc Exposure system are above in the section on New Orleans prints.

Samples of prints made in Santa Fe are in that section and were made with an different NuArc 26-1K machine using KM 43 plates. Exposures with that system were about 12 for aquatint and 16 - 20 for the image transparency

Some brief notes on paper

Paper is a great human invention and there are hundreds of types of paper suitable for use in printmaking. The choice of a paper for a particular print is highly individual and depends on many factors. Sometimes a print is more about the paper than the image.

I am deeply indebted to Nichelle Wilson-Parish for teaching me how to use Stonehenge paper. This paper is relatively inexpensive machine made and is widely regarded as a good "student paper", the latter comment generally incorporating a sneer.

Stonehenge comes in two weights. The lightweight paper is 135 grams per square meter (GSM) and the heavyweight is 250 GSM. The heavyweight paper comes in many different colors. Stonehenge is a multipurpose paper and is also commonly used for drawing and for water color painting. Stonehenge paper is very, very heavily sized, probably reflecting its use for other than printmaking purposes. Paper for water color should not permit the color to bleed, for example, and sizing may help with this. Whatever the purpose of the heavy size, for printmaking it needs to be removed or reduced. Nichelle taught me to soak the paper overnight in tap water and to change the water several times. It takes a lot of water to remove the size; I use about one gallon of water for every two sheets of paper (22 x 30 inch). After soaking, layer the paper beween towels making a stack of them and allow to dry to the proper moisture level you like to print with. The paper can remain in the towels overnight and still be damp in the morning, especially if your towels are thin and cheap like mine.

In the several other print studios I have visited or worked, paper is moistened just before printing. Sometimes briefly immersed in water then dried with towels or blotting paper, and sometimes just sprayed with a water bottle. This will not work with Stonehenge paper. The excess size will remain and will make the paper stiff and much harder to press onto the plate properly. It is my opinion that this may be why Stonehenge paper has a marginal reputation among printmakers.

I stock quantities of Stonehenge heavyweight paper in white and warm white in my studio. I find the paper fine to work with and also find that using the same paper for most of my projects allows better comparison of results by elimninating one important variable. I also have some Niddigen and several Somerset papers that I use from time to time as well as a few Japanese papers, but Stonehenge is the work horse.

When preparing paper for the lithography using the pin registration, I quickly discovered that soaking the paper after punching the pin holes changed the dimensions of the paper to change the distance between the hole by about one quarter to three-eights of an inch. Re-moistening the paper did not change the dimension to any degree. The home made pins I use are made from short lengths of brass tubing soldered to a thin (0.016 inch) copper sheet to make the ears used to tape it down. These pins will punch a hole in the paper when run through a press, using plenty of backing papers to protect the blankets. So my technique now is to tear the paper to the dimensions I want to use, soak the paper to remove the sizing, dry it and either punch it at that point, or allow the press to punch it when I make the first impression with the first plate. I do not ususally print with the paper dampened, but a light misting with a spray bottle and allowing the paper to rest for about 15 minutes does not seem to affect the dimension significantly.

The only caveat about the long soak of Stonehenge is that you will need to be careful that you not grow mold or mildew. if you work in a warm humid place like New Orleans, where the cold tap water is about 85 degrees Farenheit in summer, that can happen. Change the water a couple of times, and you should be fine. Same caution for leaving the paper in the towels overnight. Not in summer.